Do you want to create a fun and colorful ice cream truck drawing but don’t know where to start? You’re in the right place!
This step-by-step guide will walk you through every part of your drawing, making it easy and enjoyable. Whether you’re a beginner or just looking to improve your skills, you’ll find simple tips that bring your ice cream truck to life.
Ready to surprise yourself with a cool and tasty piece of art? Let’s get started!
Materials Needed
Drawing an ice cream truck can be fun and easy. You only need a few basic materials.
These items will help you create clear and colorful drawings step by step.
Pencils
Pencils are important for sketching the outline of your ice cream truck. Use a soft pencil to make light lines.
Having different pencil grades helps to add details and shading later.
- HB or 2B pencil for sketching
- 4B or 6B pencil for shading
- Eraser to fix mistakes
Paper
Choose smooth drawing paper. It should be thick enough to handle coloring.
Standard A4 size or sketchbook pages work well for practice.
Coloring Tools
Coloring tools bring your ice cream truck to life. You can use colored pencils, markers, or crayons.
Pick tools that you feel comfortable using and that match your style.
- Colored pencils for blending colors
- Markers for bright, bold colors
- Crayons for a soft look
Ruler
A ruler helps you draw straight lines. It is useful for the truck’s box shape and windows.
Use a clear or metal ruler for better accuracy.
Sharpener
Keep your pencils sharp for fine details. A sharpener is necessary to maintain pencil points.
Choose a manual or electric sharpener based on your preference.
Eraser
An eraser helps you correct mistakes and clean up your sketch. Use a soft eraser to avoid paper damage.
A kneaded eraser is good for lightening lines without fully erasing them.
Basic Shapes To Start
Drawing an ice cream truck begins with simple shapes. These shapes help form the truck’s main parts. Starting with basic shapes makes the drawing easier to manage.
Use circles, rectangles, and squares to sketch the truck’s body and wheels. This step builds the foundation for your detailed drawing.
Outline The Main Body
Start by drawing a large rectangle. This will be the truck’s main body where the ice cream is sold. Keep the lines light for easy changes later.
Add The Wheels
Draw two circles below the rectangle. These circles are the wheels. Make sure they are the same size and aligned evenly.
- Place one circle near the front bottom corner
- Place the second circle near the back bottom corner
- Leave some space between the wheels and the rectangle
Sketch The Cabin
Draw a smaller rectangle on top of the left side of the main body. This is the driver’s cabin. Use simple straight lines for the shape.
Add Windows And Door
Use smaller rectangles and squares for windows and the door. You can add these shapes inside the main body and cabin shapes.
| Shape | Purpose | Position |
| Small rectangle | Window | Upper part of cabin |
| Square | Side window | Middle of main body |
| Rectangle | Door | Lower part of main body |
Drawing The Truck Body
Drawing the body of an ice cream truck is fun and easy. Start with simple shapes to build the truck.
Focus on the main parts first before adding details. This helps keep your drawing clear and balanced.
Outline The Main Frame
Begin by drawing a large rectangle for the truck’s main body. This will be the base shape of the truck.
Add a smaller rectangle on top for the truck’s roof. Make sure the edges line up nicely with the base.
- Draw a big horizontal rectangle for the body
- Add a smaller rectangle on top for the roof
- Use straight lines to keep shapes clean
Add Wheels And Windows
Draw two circles under the main body for wheels. Place them near the front and back edges.
Sketch rectangles on the truck body for windows. Add one large window on the side for serving ice cream.
- Place two circles below the truck for wheels
- Add rectangles on the side for windows
- Draw a big serving window on the truck side

Credit: www.youtube.com
Adding Ice Cream Details
Adding ice cream details makes your ice cream truck drawing more fun. Small touches bring the truck to life. Focus on shapes and colors that show sweetness.
Use simple lines and bright colors. Details like cones, popsicles, and the serving window make the truck look ready to serve treats.
Draw Ice Cream Cones And Popsicles
Start by drawing the basic shapes of cones and popsicles. Use triangles for cones and rectangles for popsicles. Add small circles for scoops and lines for sticks.
- Draw a triangle for the cone base.
- Add circles above the cone for scoops.
- Sketch rectangles for popsicles.
- Include a thin stick under each popsicle.
- Decorate with sprinkles or stripes.
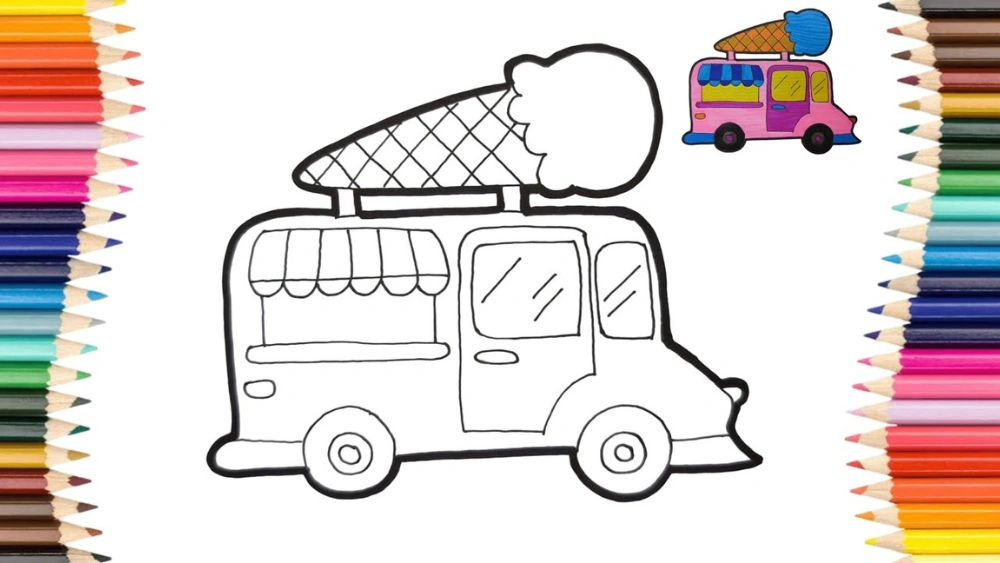
Design The Serving Window
The serving window is where customers get their ice cream. Draw a large rectangle on the truck’s side. Add a small counter under the window.
| Feature | Description |
| Window Frame | Draw a rectangle with bold lines |
| Counter | Add a narrow rectangle below the window |
| Menu Board | Place a small square or circle near the window |
| Awning | Draw a striped curved shape above the window |
Decorating The Truck
Decorating your ice cream truck makes it fun and inviting. Bright designs help it stand out on the street.
Use colors, patterns, and signs to give your truck a unique look. This makes it easy for people to spot you.
Add Colorful Patterns
Colorful patterns add energy and joy to the truck’s look. Use stripes, dots, or swirls to create interest.
Pick bright colors like red, yellow, blue, or pink. These colors remind people of ice cream flavors and fun.
- Stripes along the sides make the truck look fast and lively
- Polka dots add a playful and cheerful touch
- Swirls can represent soft serve ice cream
- Use contrasting colors to catch attention
Include Brand Name And Signs
Place the brand name clearly on the truck. Use large, easy-to-read letters so people can see it from far away.
Add signs that show your menu or ice cream pictures. This helps customers know what you offer without asking.
- Choose a bold font for the brand name
- Use bright colors for the signs
- Place signs near windows or service areas
- Include simple images of ice cream cones or popsicles

Credit: www.youtube.com
Final Touches And Shading
Adding final touches and shading brings your ice cream truck drawing to life. These details add depth and realism to your artwork.
Focus on shadows and highlights to make your ice cream truck stand out. Clean up any messy lines for a polished look.
Add Shadows And Highlights
Shadows and highlights create dimension in your drawing. Use a soft pencil for subtle shading.
Think about where the light hits your truck. Add lighter areas where light shines and darker spots for shadows.
- Shade under the truck for ground shadows
- Highlight the roof and windows for sunlight
- Darken the wheels for depth
Clean Up Sketch Lines
Remove any unnecessary sketch lines for a neat appearance. Use an eraser to gently clean up the drawing.
Make sure your final lines are clear and defined. This step makes your ice cream truck look professional and complete.
- Erase stray marks around the truck
- Define the truck’s outline with a fine pen
- Check for evenness in all lines

Credit: www.youtube.com
Frequently Asked Questions
How Do I Start Drawing An Ice Cream Truck?
Begin by sketching the basic shape of the truck using simple rectangles and squares. This helps create a solid foundation.
What Tools Are Best For Drawing An Ice Cream Truck?
Use pencils for sketching, fine liners for outlines, and colored markers or pencils for shading details and colors.
How Can I Add Realistic Details To My Ice Cream Truck?
Include elements like wheels, windows, ice cream signs, and colorful patterns to make your drawing more lifelike and fun.
What Are Common Mistakes To Avoid When Drawing?
Avoid rushing the outline and neglecting proportions. Take time to add consistent details and shading for depth.
Conclusion
Drawing an ice cream truck can be fun and simple. Step by step, you create a cool picture. Practice each part slowly and carefully. Use your favorite colors to make it lively. Keep trying, and your drawing will improve. Enjoy the process and be proud of your work.
Soon, you can draw other fun vehicles too. Drawing helps your creativity grow every day. Give yourself time and have fun with art.