Are you struggling to connect your trailer lights to your truck? Getting the wiring right can be confusing, but it’s essential for your safety and to avoid costly fines.
Imagine hitting the road with all your trailer lights working perfectly—no flickering, no guesswork, just smooth, worry-free towing. In this guide, you’ll learn simple, step-by-step instructions to hook up your trailer lights quickly and correctly. Keep reading, and you’ll be ready to tow confidently in no time.
Trailer Lighting Basics
Trailer lights are essential for safe towing. They let other drivers see your trailer’s movements.
Knowing how to connect trailer lights to your truck is important. This guide covers the basics.
Types Of Trailer Lights
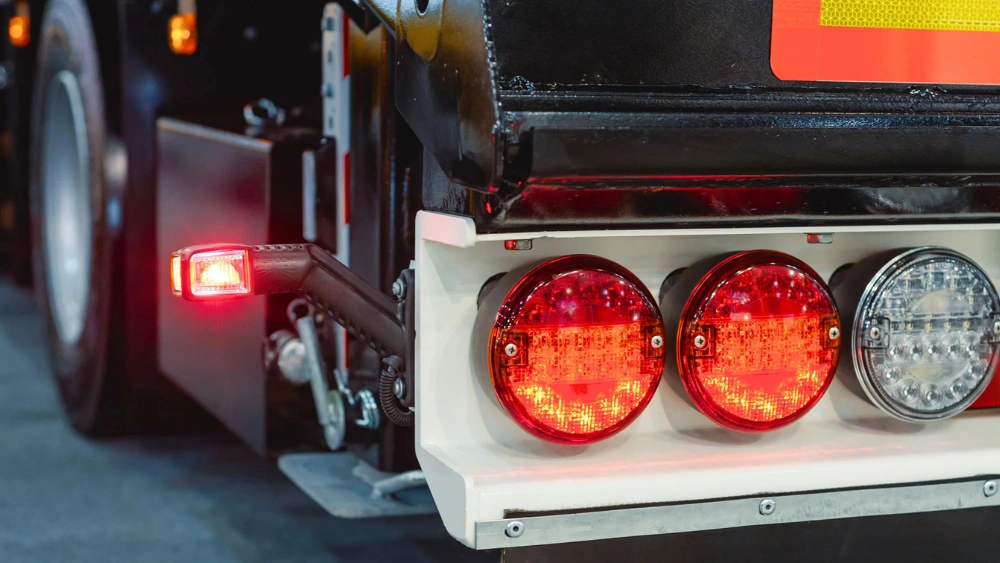
Trailer lights come in different types to show your trailer’s actions. These include brake lights, turn signals, and tail lights.
- Brake Lights:Light up when you press the brake pedal to warn drivers behind.
- Turn Signals:Blink to show you are turning left or right.
- Tail Lights:Stay on when the headlights are on to show the trailer’s rear.
- Reverse Lights:Illuminate when backing up to signal other drivers.
- Side Marker Lights:Help others see the trailer’s size and position at night.
Common Wiring Connectors
Trailer lights connect to your truck using wiring connectors. These connectors help send power and signals safely.
| Connector Type | Number of Pins | Common Use |
|---|---|---|
| 4-Pin | 4 | Basic lights: tail, brake, and turn signals |
| 5-Pin | 5 | Includes reverse lights or electric brakes |
| 6-Pin | 6 | More functions, including auxiliary power |
| 7-Pin | 7 | Most common for trailers with brakes and extra features |
Safety Requirements
Trailer lighting must meet safety rules. These rules keep you and others safe on the road.
- Lights must be visible from at least 500 feet away at night.
- All signals must work correctly before driving.
- Use the right wiring and connectors to avoid shorts or failures.
- Check lights often for damage or dirt that blocks light.
- Follow local laws for trailer lighting requirements.

Credit: www.temu.com
Tools And Materials Needed
Hooking up trailer lights to your truck requires the right tools and materials. Having everything ready will make the job easier and safer.
This guide covers the essential tools, required materials, and optional accessories for the task.
Essential Tools
You need some basic tools to connect trailer lights correctly. These tools help you cut, strip, and secure wires.
- Wire stripper and cutter
- Crimping tool
- Screwdriver set (flathead and Phillips)
- Electrical tape
- Multimeter for testing connections
- Socket wrench set
- Heat shrink tubing and heat gun
Required Materials
| Material | Purpose |
| Trailer wiring harness | Connects trailer lights to truck |
| Connectors and terminals | Join wires securely |
| Fuses or circuit breakers | Protect electrical system |
| Wire loom or conduit | Protect wires from damage |
| Ground wire | Ensure electrical grounding |
Optional Accessories
Some extra items can make your wiring job cleaner and more durable. These accessories help with organization and protection.
- Wire ties to bundle cables
- Protective rubber boots for connectors
- Trailer light tester tool
- Silicone spray to prevent corrosion
Preparing The Truck And Trailer
Connecting trailer lights to a truck requires careful preparation. This ensures the lights work safely and correctly.
Start by checking the truck and trailer wiring, cleaning all connection points, and verifying the battery and fuses.
Inspecting Existing Wiring
Look over the wires on both the truck and trailer. Check for cracks, cuts, or loose ends.
Damaged wiring can cause the lights to fail or blink incorrectly. Fix or replace any broken wires before connecting.
- Check wire insulation for cracks or breaks
- Look for loose or corroded connectors
- Test the wires with a voltage meter if available
- Replace wires that show signs of damage
Cleaning Connection Points
Clean the plugs and sockets where the truck and trailer connect. Dirt and rust block electrical flow.
Use a wire brush or sandpaper to remove rust and dirt from connectors. Make sure they fit snugly together.
- Remove dirt or grime from plug and socket surfaces
- Use electrical contact cleaner if needed
- Dry connectors fully before connecting
- Check for bent or damaged pins in the plug
Checking Battery And Fuses
Check the truck’s battery to ensure it has enough power. Weak batteries may cause trailer lights to dim or fail.
Inspect the fuse box for blown fuses related to trailer lights. Replace any blown fuses with ones of the same rating.
- Test battery voltage with a multimeter
- Look for corrosion on battery terminals
- Replace or tighten corroded battery connections
- Check trailer light fuses and swap blown ones
Wiring The Trailer Lights
Wiring trailer lights to your truck is important for safety on the road. It helps other drivers see your trailer signals clearly.
Understanding how to connect each wire correctly makes the process easier and avoids electrical problems.
Identifying Wire Functions
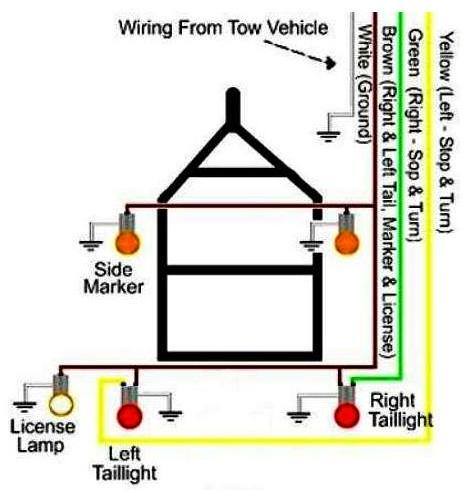
Trailer wiring has different colored wires. Each color controls a specific light on the trailer. Knowing which wire does what is the first step.
- White wire: Ground connection
- Brown wire: Tail lights
- Red wire: Left turn signal and brake lights
- Green wire: Right turn signal and brake lights
Connecting The Ground Wire
The ground wire is usually white and is very important. It completes the electrical circuit and stops flickering lights.
Attach the white ground wire to a clean, bare metal surface on the truck frame. Use a ring terminal and a screw for a solid connection.
Hooking Up Tail And Brake Lights
The brown wire controls the tail lights. Connect this wire to the truck’s tail light wire. This lets the trailer lights turn on with the truck’s headlights.
The red wire handles the left brake light and turn signal. Connect it to the truck’s left brake light wire carefully to avoid wrong signals.
Attaching Turn Signal Wires
The green wire controls the right brake light and turn signal. Connect it to the truck’s right brake light wire for proper signaling.
Make sure all connections are tight and insulated. Use electrical tape or heat shrink tubing to protect the wires from water and dirt.
Testing The Connection
After hooking up trailer lights to your truck, testing is important. It ensures all lights work correctly. A proper test helps keep you safe on the road.
Check each light to confirm power and function. Testing also lets you find and fix any problems fast.
Checking Each Light Function
Test every trailer light separately. Turn on your truck’s lights and signals. Watch the trailer lights to see if they respond.
- Turn on the running lights to check tail lights.
- Use the brake pedal to test brake lights.
- Activate left and right turn signals one at a time.
- Test hazard lights by turning on both signals.
Troubleshooting Common Issues
If any light does not work, check the wiring first. Look for loose or broken connections. Sometimes fuses can blow and need replacement.
- Make sure the trailer connector is clean and free of rust.
- Check the vehicle’s fuse box for blown fuses.
- Inspect wires for cuts or wear.
- Test trailer bulbs to see if they need replacement.
Ensuring Secure Connections
Secure connections keep lights working during travel. Use proper connectors and tighten them firmly. Loose plugs cause intermittent light problems.
- Push connectors fully into the socket.
- Use dielectric grease to prevent corrosion.
- Secure wires with zip ties to avoid movement.
- Check connections regularly before trips.
Credit: tventuring.com
Maintaining Trailer Light Connections
Trailer lights are important for safety on the road. Keeping them in good shape ensures they work well.
Regular checks and care can prevent problems. Here are some tips to keep your trailer lights working.
Regular Inspection Tips
Check your trailer lights before every trip. Look for broken or dim lights.
Inspect the wiring for cracks or wear. Make sure all connections are tight.
- Test all lights: brake, turn, and marker
- Examine wires for damage
- Ensure connections are secure
Protecting Against Corrosion
Corrosion can cause trailer lights to fail. Moisture is often the cause.
Use dielectric grease on connections to keep moisture out. This helps prevent rust.
- Apply grease to connectors
- Keep lights clean and dry
- Store trailer in dry area
Upgrading Wiring Systems
Older wiring can cause issues with trailer lights. Upgrading can improve reliability.
Consider using a wiring kit for better connections. This can reduce the chance of failure.
- Use a wiring kit for upgrades
- Choose high-quality materials
- Follow instructions carefully
Credit: www.trailvoy.com
Frequently Asked Questions
How Do I Connect Trailer Lights To My Truck?
To connect trailer lights, match the truck’s wiring harness to the trailer’s plug. Use a compatible adapter if needed. Secure all connections and test lights before driving for safety.
What Tools Are Needed For Trailer Light Hookup?
You need wire strippers, electrical tape, a multimeter, connectors, and possibly a wiring adapter. These tools ensure a secure, safe connection between truck and trailer lights.
How To Test Trailer Lights After Installation?
Turn on the truck’s lights and check the trailer’s brake, turn signals, and running lights. Use a helper or a reflective surface to verify all lights function correctly.
Can I Use Truck Wiring Without An Adapter?
Direct wiring is possible but risky without proper knowledge. Using an adapter ensures compatibility and prevents damage to the truck’s electrical system.
Conclusion
Connecting trailer lights to your truck is simple and important. Always check your wires carefully before starting. Use the right tools and follow steps for safety. Test the lights after hooking them up to avoid problems. This helps you stay safe on the road.
Keep your trailer lights working well for every trip. A little care makes a big difference in towing. Now you are ready to tow with confidence.