
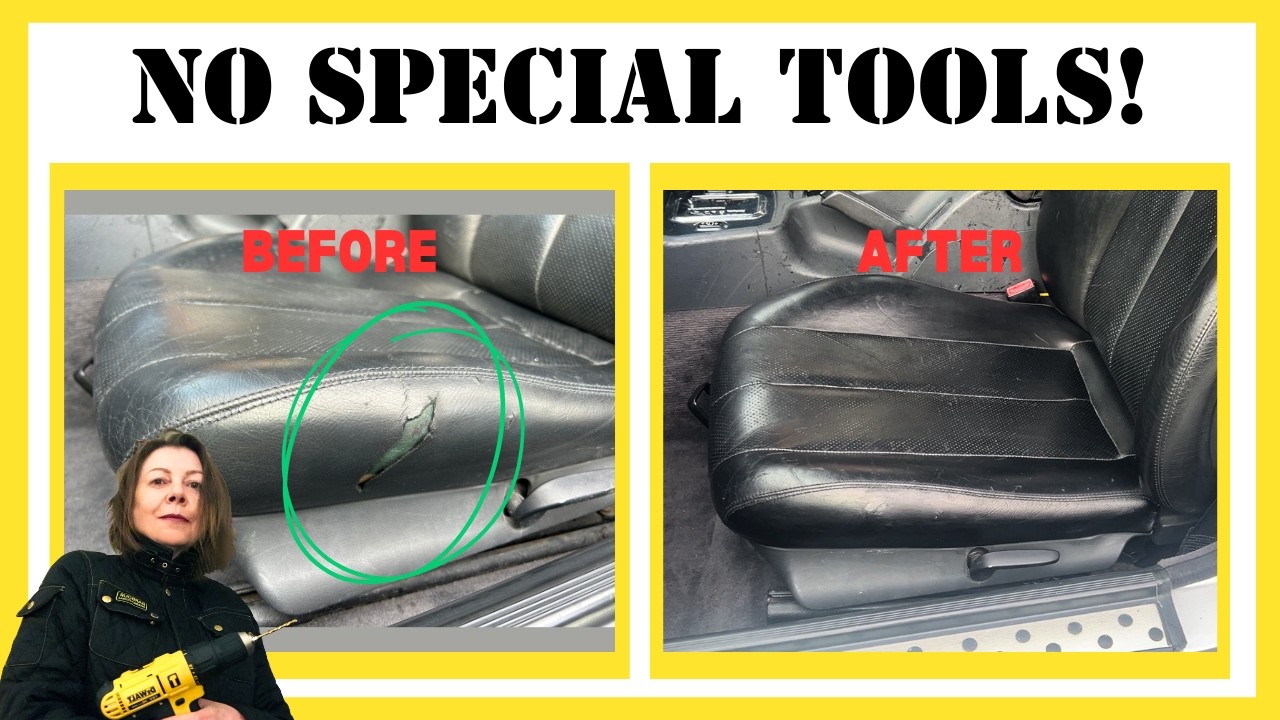
Your car seats show cracks, and it’s frustrating to see your leather looking worn and damaged. You might think fixing those cracks means spending a lot of money or replacing the entire seat.
But what if you could repair your leather seats yourself, saving both time and money? You will discover simple, effective steps to bring your cracked leather seats back to life. Keep reading, because your car deserves that fresh, smooth look—and so do you.
Tools And Materials Needed
Fixing cracked leather seats in your car needs the right tools. Using proper materials helps the repair last longer.
This guide covers the basic items you will need. These tools make the repair easier and more effective.
Essential Repair Kits
Leather repair kits usually include everything to fix cracks and tears. These kits save you time and money.
- Leather filler to fill cracks and holes
- Color compounds to match your seat color
- Spatulas or applicators to spread filler evenly
- Sandpaper to smooth the repaired area
- Heat tools to cure the repair material
Cleaning Supplies
Cleaning your leather before repair is important. Dirt and oils stop the filler from sticking well.
- Mild leather cleaner or soap
- Soft cloths or microfiber towels
- Warm water for rinsing
- Leather conditioner to soften the leather before repair
Protective Gear
Wear protective gear to keep yourself safe. Some repair materials can irritate skin or eyes.
- Disposable gloves to protect your hands
- Safety glasses to shield your eyes
- A mask to avoid inhaling fumes
- Old clothes to avoid stains
Credit: www.youtube.com
Preparing The Seat
Fixing cracked leather seats starts with good preparation. You must clean and smooth the surface well.
This step helps the repair materials stick better and last longer.
Cleaning The Leather Surface
First, clean the leather surface to remove dust and loose dirt. Use a soft cloth and leather cleaner made for cars.
Wipe the whole seat gently. Avoid harsh scrubbing that could cause more damage.
Removing Dirt And Oils
Oils from skin and dirt can stop repair products from sticking. Remove them carefully.
- Use a leather degreaser or rubbing alcohol on a clean cloth.
- Rub the cracked areas lightly to lift oils.
- Let the seat dry fully before the next step.
Sanding The Cracks
Sanding smooths the cracked leather and helps fillers bond better. Use fine-grit sandpaper for this task.
| Sandpaper Grit | Purpose |
| 400-600 | Lightly smooth cracks |
| 800-1000 | Prepare surface for filler |
Repairing The Cracks
Cracked leather seats look old and worn out. Fixing these cracks can make your car look fresh again. Repairing cracks needs patience and the right materials.
Start by cleaning the cracked area well. This helps the repair materials stick better. Next, carefully fill and smooth the cracks to restore the leather’s surface.
Applying Leather Filler
Leather filler fills the cracks and holes in the seat. Use a small spatula to apply the filler inside the cracks. Press it gently to remove air pockets.
Apply the filler in thin layers. Let each layer dry before adding the next. This prevents peeling and makes the repair strong.
Smoothing The Surface
After the filler dries, smooth the surface with fine sandpaper. Sand lightly to avoid removing too much filler. The goal is a flat and even finish.
Wipe away dust with a clean cloth. A smooth surface helps the leather look natural after repair. It also makes color matching easier.
Layering For Durability
Apply several thin layers of filler for long-lasting repair. Each layer adds strength and fills small cracks. Let every layer dry fully before the next.
- Use thin layers to avoid lumps
- Dry each layer completely
- Check the surface before adding more filler
- Finish with light sanding for smoothness
Color Matching And Painting
Repairing cracked leather auto seats needs careful color matching and painting. This helps the repair look natural and last longer.
Using the right dye and painting techniques brings the old leather back to life. Good blending hides cracks and damage.
Choosing The Right Leather Dye
Select a leather dye that matches your seat’s original color closely. Look at the leather in good light to find the true shade.
Test small areas first. Different dyes work better on different leather types. Pick a dye made for auto leather.
- Choose dyes with flexible formulas
- Pick colors labeled for automotive leather
- Test dye on hidden spots before use
Applying Color Evenly
Apply dye in thin, even layers to avoid streaks. Use a sponge or airbrush for smooth coverage.
Let each layer dry before adding the next. This builds color depth and prevents uneven patches.
- Clean seat surface before applying dye
- Work in small sections for control
- Use light, consistent strokes
- Allow drying time between coats
Blending With Existing Leather
Blend the new dye into the old leather to hide repair edges. Feather the color out to merge smoothly.
Use a soft cloth or brush to gently blend. Match the texture and gloss of the original leather for a natural look.
- Feather color edges with a damp cloth
- Match leather shine with a finishing product
- Work quickly before dye dries
- Repeat blending as needed
Finishing Touches
After repairing cracked leather auto seats, finishing touches protect the work. These steps help keep the leather strong and looking good.
Proper finishing improves the seat’s durability and feel. It also helps the repair blend with the rest of the leather.
Sealing The Repair
Sealing the repaired area stops moisture and dirt from entering. It creates a protective layer over the fix.
Use a leather sealant or finish that matches your repair kit. Apply it evenly with a soft brush or cloth.
- Apply thin, even coats
- Allow each coat to dry before adding another
- Cover the entire repaired area and blend edges
Conditioning The Leather
Conditioning keeps leather soft and prevents cracks from returning. It adds moisture back to the material.
Choose a leather conditioner that suits your seat type. Apply it gently using a clean cloth in small circles.
- Test conditioner on a small spot first
- Use moderate amounts to avoid oversaturation
- Let the conditioner absorb fully into the leather
Drying And Curing Time
Drying and curing make the repair strong and long-lasting. The leather needs time to set after sealing and conditioning.
Keep the car in a dry, shaded place during this time. Avoid sitting on or stressing the repaired area until fully cured.
- Allow at least 24 hours for drying
- Avoid direct sunlight or heat sources
- Check repair firmness before use

Credit: www.youtube.com
Maintenance Tips
Cracked leather seats in your car can be a real eyesore. Regular maintenance helps prevent damage and keeps seats looking new.
Follow these simple tips to maintain and protect your leather car seats. Consistent care ensures longevity and comfort.
Regular Cleaning Routine
Cleaning is the first step in maintaining leather seats. Use a gentle leather cleaner to wipe away dirt and grime.
Apply the cleaner with a soft cloth, making sure to reach all areas. Do this every few weeks for best results.
- Vacuum seats before cleaning
- Test cleaner on a small area first
- Wipe off excess cleaner with a dry cloth
Protecting Against Future Damage
Protecting your leather seats is crucial. Use a leather conditioner to keep the material soft and flexible.
Conditioning prevents cracking and fading. Apply it monthly to shield your seats from wear and tear.
When To Seek Professional Help
Sometimes, damage is too severe for home remedies. Deep cracks or tears may need a professional touch.
Seek expert help if you notice significant damage. Professionals can restore the leather to its original state.
| Significant fading | Deep cracks | Large tears |
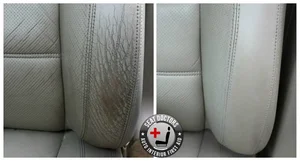
Credit: www.seatdoctors.com
Frequently Asked Questions
How Can I Fix Small Cracks In Leather Seats?
Small cracks can be repaired using a leather repair kit. Clean the area, apply filler, and let it dry. Then, use leather dye to match the seat color for a seamless finish.
What Materials Do I Need To Repair Cracked Leather Seats?
You need a leather cleaner, filler compound, sandpaper, leather dye, and a finishing sealant. These materials help clean, fill, color, and protect the leather surface effectively.
How Long Does It Take To Repair Cracked Leather Seats?
Repairing cracked leather seats usually takes 1 to 3 hours. Drying times vary depending on the filler and dye used. Proper drying ensures a durable and smooth finish.
Can I Repair Leather Seats Without Professional Help?
Yes, DIY repair kits are available for easy fixes. Follow instructions carefully for the best results. For extensive damage, professional repair is recommended.
Conclusion
Repairing cracked leather auto seats can save you money and improve comfort. Small cracks need quick care to stop damage from spreading. Use gentle cleaners and quality repair kits for best results. Take time to follow each step carefully for a smooth finish.
Regular care keeps leather soft and lasting longer. A few simple actions can make old seats look fresh again. Try these tips to keep your car’s interior neat and inviting.