
Wiring a light bar on your truck might sound tricky, but it doesn’t have to be. Imagine having brighter, clearer lighting for your night drives or off-road adventures, all set up by you.
In this guide, you’ll find simple, step-by-step instructions that anyone can follow. By the end, you’ll not only save money but also gain confidence in upgrading your truck’s lighting. Ready to light up the road your way? Let’s get started!

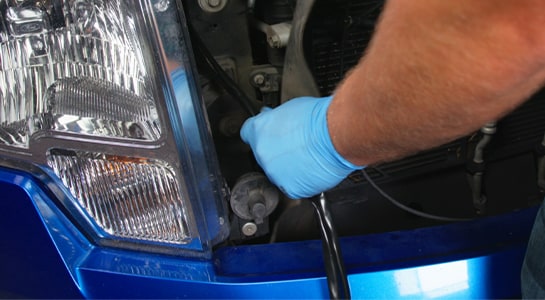
Credit: www.youtube.com
Tools And Materials Needed
Wiring a light bar on your truck requires the right tools and materials. Having these ready makes the job easier and safer.
This guide lists everything you need before starting the installation.
Basic Tools
Basic tools help you handle wiring and mounting tasks effectively.
- Wire strippers and cutters
- Crimping tool
- Electric drill with bits
- Screwdrivers (flathead and Phillips)
- Socket wrench set
- Multimeter for electrical testing
Electrical Components
Use quality electrical parts to ensure a strong and safe connection.
| Component | Purpose |
| Light bar | Main lighting device |
| Wiring harness | Connects light bar to power source |
| Relay | Protects circuit and controls power |
| Switch | Allows user to turn light bar on/off |
| Fuse | Prevents electrical overload |
| Connectors and terminals | Secure wire connections |
Additional Materials
These extra items help with installation and ensure durability.
- Electrical tape
- Heat shrink tubing
- Cable ties
- Mounting brackets or clamps
- Silicone sealant (for waterproofing)
Choosing The Right Light Bar
Choosing the right light bar is important for safety and performance. The right light bar brightens your path and fits your truck well.
Consider the size, brightness, and mounting style before buying. This guide helps you pick the best light bar for your truck.
Light Bar Size And Length
Light bars come in many sizes. Choose one that fits your truck’s roof or bumper. Too large can block views. Too small may not light enough area.
Brightness And Light Output
Brightness is measured in lumens. Higher lumens mean more light. Think about how much light you need for your driving area. Avoid light bars that are too bright for street use.
Types Of Light Bars
- Spot Light Bars: Shine a narrow, focused beam for long distance.
- Flood Light Bars: Produce wide light for close range.
- Combo Light Bars: Mix spot and flood beams for both distance and width.
Mounting Options
| Mount Type | Description | Best For |
| Roof Mount | Placed on top of the truck roof. | Wide light coverage, off-road use. |
| Bumper Mount | Installed on front bumper or grill. | Lower profile, highway driving. |
| Grille Mount | Attached inside the truck grille. | Clean look, moderate lighting. |
Power And Wiring Requirements
Check the light bar’s voltage and current needs. Most use 12V systems like your truck. Ensure your wiring and fuse match these needs for safety.
Durability And Weather Resistance
Look for these features:
- Waterproof rating (IP67 or higher)
- Shock resistance for rough roads
- Rust-proof housing
Preparing The Truck For Installation
Wiring a light bar on your truck needs careful preparation. It helps ensure safety and proper function.
Start by making sure your truck is ready. This saves time and prevents problems during installation.
Gather Necessary Tools And Materials
Before starting, collect all tools and parts you need. This makes the installation smoother.
- Wire stripper and crimper
- Electrical tape and connectors
- Fuse holder and appropriate fuse
- Switch for light bar control
- Light bar wiring harness
- Zip ties for securing wires
- Drill and bits (if mounting holes needed)
Disconnect The Truck Battery
Always disconnect the battery before working on electrical parts. This avoids shocks and shorts.
Remove the negative cable first. Keep the cable away from the battery terminal during work.
Select The Mounting Location
Pick a spot on the truck where the light bar fits well. Check for clear space and good visibility.
Common places are the roof, front bumper, or grille guard. Make sure the area is strong enough to hold the light bar.
- Check for wiring or components behind the mounting area
- Measure to center the light bar properly
- Mark drilling spots carefully if needed
Clean The Mounting Surface
Clean the area where you will mount the light bar. Dirt or grease can stop the mount from holding.
Use a cloth and mild cleaner. Let the surface dry before installing the light bar.
Plan The Wiring Route
Think about how wires will run from the light bar to the battery and switch. Avoid hot or moving parts.
- Keep wires away from the engine and exhaust
- Use existing wire channels if possible
- Plan to secure wires with zip ties
- Allow enough slack for door and hood movement
Mounting The Light Bar
Mounting a light bar on your truck is important for safety and visibility. You need to choose the right spot and secure it well.
This guide covers key points to help you mount the light bar correctly and safely on your truck.
Choose The Mounting Location
Select a spot that gives the light bar a clear view ahead. The roof, front bumper, or grille are common places.
Make sure the location does not block your view or interfere with other truck parts.
Prepare The Mounting Surface
Clean the surface where you will mount the light bar. Remove dirt, grease, and rust for a strong hold.
Check if you need to drill holes or use existing mounting points on your truck.
Secure The Mounting Brackets
- Align the brackets with the mounting holes.
- Use bolts and nuts that fit well and are rust-resistant.
- Tighten the bolts firmly but avoid over-tightening.
- Check that the brackets hold the light bar steady without movement.
Adjust The Light Bar Angle
Once mounted, adjust the light bar angle. Aim it slightly downward to light the road without blinding other drivers.
Test the angle by turning on the light bar and checking the beam spread.
Check Wiring Clearance
Ensure the wiring does not interfere with moving parts or sharp edges. Use zip ties to keep wires neat and safe.
| Potential Hazard | Solution |
|---|---|
| Sharp edges near wiring | Use protective tubing |
| Loose wires | Secure with zip ties |
| Moving parts contact | Route wires away carefully |
Wiring Basics For Light Bars
Wiring a light bar on your truck is a simple task if you know the basics. Good wiring keeps your light bar working safely and well.
This guide covers important wiring tips for installing a light bar on your truck. It helps you avoid common mistakes.
Understanding Your Light Bar Wires
Most light bars come with three wires: positive, negative, and sometimes a switch wire. Knowing these helps connect your light bar correctly.
The positive wire connects to the battery or fuse box. The negative wire goes to the truck’s ground. The switch wire controls turning the light bar on and off.
Use A Relay For Safety
A relay helps protect your truck’s electrical system. It handles the high power your light bar needs without damaging other parts.
Connect the relay between the battery and the light bar. The relay’s switch is controlled by the light bar switch inside the truck.
Choose The Right Fuse
Fuses stop electrical fires by breaking the circuit if the current is too high. Use a fuse that matches your light bar’s power needs.
- Check the light bar’s amperage rating
- Pick a fuse with the same or slightly higher rating
- Install the fuse close to the battery
Ground Your Light Bar Properly
A good ground connection is key for your light bar to work well. Connect the negative wire to a clean metal part of your truck.
Remove paint or rust from the spot before attaching the wire. This ensures a strong connection and prevents electrical problems.
Use Quality Connectors And Wires
Good connectors and wires make your installation last longer. Use wires that can handle the light bar’s power safely.
- Choose wires with the right thickness (gauge)
- Use waterproof connectors to stop corrosion
- Secure wires with zip ties to avoid damage

Credit: www.amazon.com
Connecting The Wiring Harness
Connecting a wiring harness to your truck’s light bar is an important task. This ensures the light bar functions properly and safely.
Follow these steps to connect the wiring harness with ease and precision. Make sure to have all tools ready before starting.
Gather Necessary Tools
Before you begin, gather all the tools you’ll need. This will make the process smoother and help avoid interruptions.
- Screwdriver
- Wire cutter
- Electrical tape
- Socket wrench
- Multimeter
Identify Wiring Points
Locate the wiring points on your truck. This is where the harness will connect to the light bar. Look for existing wiring or marked spots.
Connect The Wires
Carefully connect the wires from the harness to the truck. Ensure each wire matches the correct terminal. This prevents short circuits.
| Wire Color | Connection Point |
| Red | Positive terminal |
| Black | Negative terminal |
| White | Ground |
Test The Connection
After connecting, test the light bar. Turn it on and check if it lights up properly. Use a multimeter to ensure the current flows correctly.
Secure The Wiring
Finally, secure the wiring harness in place. Use zip ties or clamps to keep it steady. This avoids any loose wires that might cause issues.
Installing The Switch
Installing the switch for your truck’s light bar is crucial. It allows you to control the light bar easily and safely from the driver’s seat.
This guide will help you install the switch correctly. Follow these steps to ensure a secure and functional setup.
Locate A Suitable Spot
Find a convenient location for the switch in your truck. It should be within easy reach while driving.
- Avoid places that require you to take your eyes off the road.
- Consider the dashboard or center console for easy access.
- Ensure there is enough space behind the panel for wiring.
Drill A Hole For The Switch
Once you choose a spot, drill a hole for the switch. Use a drill bit that matches the switch size to ensure a snug fit.
Connect The Wires
Wiring the switch correctly is essential. Connect the light bar, power source, and ground wires to the switch terminals.
- Connect the power wire to the positive terminal.
- Attach the ground wire to the negative terminal.
- Secure the light bar wire to the output terminal.
Test The Switch
After connecting the wires, test the switch. Ensure the light bar turns on and off correctly when you flip the switch.
| Action | Expected Result |
| Switch ON | Light bar illuminates |
| Switch OFF | Light bar turns off |
Credit: www.oreillyauto.com
Testing The Light Bar
Testing your truck’s light bar ensures it works correctly and safely. It helps you find wiring or connection problems early.
Follow simple steps to check the light bar after wiring. This way, you can enjoy proper lighting on the road.
Visual Inspection
Look over all wiring and connections before turning on the light bar. Check for loose wires, damaged cables, or poor connections.
Powering On The Light Bar
Turn on the truck’s battery and switch on the light bar. Watch carefully to see if all lights turn on and shine brightly.
Using A Multimeter
A multimeter helps check if the light bar gets the right voltage. Set it to measure DC voltage and connect the probes to the light bar wires.
- Place the red probe on the positive wire
- Place the black probe on the negative wire
- Read the voltage on the display
- Compare it with the light bar’s voltage rating
Checking The Switch And Relay
Test the switch and relay to ensure they work properly. Flip the switch and listen for a clicking sound from the relay.
| Component | Test Method | Expected Result |
|---|---|---|
| Switch | Turn it on and off | Switch clicks and light bar responds |
| Relay | Listen for clicking sound | Relay clicks on switch activation |
| Wiring | Inspect visually | No breaks or loose connections |
Troubleshooting Common Issues
Wiring a light bar on your truck can sometimes cause problems. Knowing how to find and fix these issues saves time and effort.
This guide covers common wiring problems and simple ways to solve them.
Light Bar Does Not Turn On
If your light bar does not light up, start by checking the power source. Make sure the battery is charged and the connections are tight.
Fuses Keep Blowing
Blown fuses often mean too much current is flowing. This could happen if wires touch metal parts or if the light bar uses more power than the fuse allows.
- Check for damaged or exposed wires.
- Use the correct fuse rating for your light bar.
- Avoid routing wires near sharp edges or hot engine parts.
Light Flickers Or Works Intermittently
Flickering usually means a loose connection. Inspect all wiring and connectors for tightness and corrosion.
Switch Or Relay Does Not Work
If the switch or relay does not operate, test the relay coil and switch wiring. A bad relay or broken wire can stop power flow.
| Issue | Possible Cause | Solution |
| Light Bar Does Not Turn On | Dead battery or loose connection | Charge battery, tighten connections |
| Fuses Keep Blowing | Short circuit or wrong fuse | Check wires, replace fuse with correct rating |
| Light Flickers | Loose or corroded connections | Secure and clean all connectors |
| Switch/Relay Fails | Faulty relay or wiring | Test and replace relay or fix wiring |
Safety Tips And Best Practices
Wiring a light bar on your truck needs care and attention. Safety is very important to avoid accidents and damage.
Follow best practices to make your wiring safe and reliable. Use the right tools and parts for a good job.
Disconnect The Battery Before Starting
Always disconnect your truck’s battery before wiring the light bar. This stops electric shocks and short circuits.
Remove the negative cable first. This reduces the risk of sparks while working on electrical parts.
Use Proper Fuses And Relays
Install the correct fuse size to protect your wiring and light bar. Fuses stop wires from overheating.
Use a relay to handle high power safely. It helps control the light bar without overloading the switch.
- Check the light bar’s power rating
- Choose a fuse with matching amperage
- Use a relay rated for the current
Secure All Wiring Properly
Tie wires tightly to prevent them from moving or rubbing on sharp parts. Loose wires can break or short out.
Use zip ties or clamps to hold wires in place. Keep wires away from hot engine parts and sharp edges.
- Inspect wiring routes for damage risks
- Avoid pinching wires in moving parts
- Cover exposed wires with protective sleeves
Choose The Right Wire Gauge
Use wires thick enough for the light bar’s power. Thin wires can overheat and cause fires.
Check wire gauge charts to pick the right size. Larger amps need thicker wires to work safely.
| Light Bar Current (Amps) | Recommended Wire Gauge (AWG) |
|---|---|
| 0-10 | 16 |
| 10-20 | 14 |
| 20-30 | 12 |
| 30-40 | 10 |
Test Your Wiring Before Finalizing
After wiring, test the light bar to make sure it works properly. Check all connections for power.
Look for any signs of overheating or loose wires. Fix problems before closing up and securing everything.
- Turn on the light bar and check brightness
- Feel wires for heat after a few minutes
- Listen for buzzing or clicking sounds
- Make sure switches operate smoothly
Frequently Asked Questions
How Do I Wire A Light Bar To My Truck Battery?
Connect the light bar’s positive wire to the battery’s positive terminal using a fuse. Attach the negative wire to the truck’s chassis ground for safe wiring.
What Tools Are Needed To Wire A Truck Light Bar?
You need wire cutters, crimpers, a fuse holder, electrical tape, a relay, and a switch. These tools ensure a secure and safe installation.
Can I Wire A Light Bar To The Truck’s Existing Fuse Box?
Yes, but use an appropriate relay and fuse. This prevents overloading the fuse box and protects your truck’s electrical system.
What Is The Best Way To Ground A Light Bar On A Truck?
Attach the light bar’s negative wire to a clean, unpainted metal surface on the truck chassis. This provides a stable and effective ground connection.
Conclusion
Wiring a light bar on your truck is easier than it seems. Follow each step with care and patience. Use the right tools and parts for safety. Check all connections before turning the power on. Proper wiring helps your light bar work well and last longer.
Take your time, and do not rush the process. Enjoy better visibility on your drives at night or off-road. Simple steps lead to great results and safer travels.