
Are you having trouble with your auto relay and don’t know where to start? Testing your auto relay is simpler than you might think, and doing it right can save you time and money on repairs.
In this guide, you’ll learn easy steps to check if your relay is working properly, so you can keep your vehicle running smoothly. Keep reading, and by the end, you’ll feel confident to test your auto relay yourself without any guesswork.

Credit: www.youtube.com
Auto Relay Basics
An auto relay is an electrical switch that controls circuits. It works automatically without manual help. Testing auto relays ensures they function correctly in machines and vehicles.
Understanding the parts and types of auto relays helps in proper testing and maintenance. This guide covers basic knowledge to get started with testing auto relays.
Types Of Auto Relays
Auto relays come in several types. Each type serves a different purpose in electrical systems. Knowing these types helps you choose the right test method.
- Electromechanical relays use coils and contacts to switch circuits.
- Solid-state relays use electronic components with no moving parts.
- Thermal relays protect devices from overheating by opening circuits.
- Time delay relays switch circuits after a set time period.
Common Relay Components
Relays have several key parts. These parts work together to control electric flow. Knowing each part helps in testing and fixing problems.
| Component | Function |
|---|---|
| Coil | Creates magnetic field to move contacts |
| Contacts | Open or close to control the circuit |
| Armature | Moves contacts when magnetized |
| Spring | Returns armature to original position |
| Frame | Holds all parts together |

Credit: www.oreillyauto.com
Essential Tools For Testing
Testing an auto relay requires the right tools to get accurate results. Using proper tools helps you find faults quickly.
This guide covers essential tools and how to use them for testing auto relays safely and effectively.
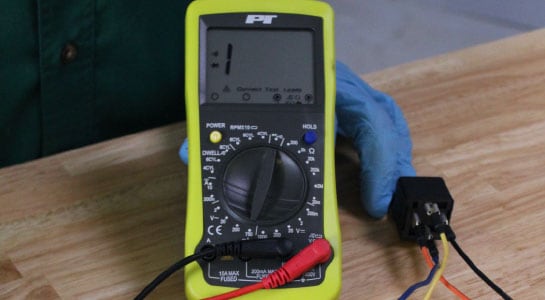
Multimeter Usage
A multimeter measures electrical values such as voltage, current, and resistance. It helps check if the relay coil and contacts work well.
- Set the multimeter to the correct measurement mode.
- Test the relay coil resistance by connecting leads to coil terminals.
- Check continuity across the relay contacts when activated.
- Measure voltage at the relay terminals during operation.
Test Light And Power Source
A test light helps check if power reaches the relay. A stable power source is needed to activate the relay during tests.
| Tool | Purpose | How to Use |
| Test Light | Detects presence of voltage | Connect to power and ground; light glows if voltage is present |
| Power Source | Supplies voltage to relay coil | Use a battery or regulated supply matching relay specs |
Preparing For Relay Testing
Testing an auto relay requires careful preparation to ensure safety and accuracy. Before starting, gather all needed tools and understand the relay system.
Proper preparation helps avoid damage to equipment and protects the tester from harm. Follow clear steps to prepare well.
Safety Precautions
Safety is the top priority when testing relays. Electrical parts can cause shock or fire if handled carelessly.
- Wear insulated gloves and safety glasses.
- Turn off the main power before opening panels.
- Use tools with insulated handles.
- Keep the work area dry and clear of clutter.
- Check for any signs of damage on wires and equipment.
Locating The Relay
Finding the right relay is key to testing it correctly. Relays are usually inside control panels or near the equipment they protect.
| Common Relay Locations | Description |
|---|---|
| Control Panels | Most relays are mounted inside to protect wiring and connections. |
| Near Motors | Relays controlling motor starters are often close to the motors. |
| Distribution Boards | Some relays are placed where power is distributed to different circuits. |
| Equipment Enclosures | Relays can be inside specific equipment cases for protection. |
Step-by-step Testing Procedure
Testing an auto relay is important for vehicle health. It ensures the relay functions correctly in your car’s electrical system.
This guide will help you perform tests on your auto relay. Follow these easy steps to check the relay’s condition.
Checking Coil Resistance
To test the coil resistance, you’ll need a multimeter. This tool measures the resistance across the relay’s coil.
- Set the multimeter to the ohm setting.
- Connect the probes to the coil terminals.
- Check the resistance reading on the multimeter.
- Compare the reading to the relay’s specifications.
Testing Continuity
Continuity tests ensure that the relay’s circuit is complete. This step involves checking the paths for electrical flow.
| Test Point | Expected Result |
| Terminal 30 to 87 | No Continuity |
| Terminal 85 to 86 | Continuity |
Verifying Relay Activation
Relay activation confirms it switches properly. You will simulate the relay’s operation in this step.
Use a 12V power source to energize the coil. Listen for a clicking sound indicating activation. Confirm the circuit closes between terminals 30 and 87.
Interpreting Test Results
Testing an auto relay helps find electrical problems fast. Reading the results right keeps your device safe.
Look closely at the test data. It shows if the relay works well or has issues.
Common Fault Indicators
Some signs tell you the relay may be faulty. Watch for these to avoid bigger problems.
- No clicking sound during tests means a stuck or dead relay.
- Voltage readings that are too low or too high show poor contact.
- Continuous current flow when the relay is off signals a short circuit.
- Intermittent operation can indicate worn-out internal parts.
- Burn marks or corrosion on relay terminals mean damage.
When To Replace The Relay
Replace the relay if test results show clear failure. Do not try to fix a bad relay yourself.
Replace the relay in these cases:
- The relay does not activate during the test.
- Voltage or current readings stay outside normal range.
- The relay causes electrical shorts or sparks.
- Physical damage, such as cracks or corrosion, is visible.
- Relay fails repeatedly after multiple tests.
Credit: www.oreillyauto.com
Tips For Accurate Testing
Testing an auto relay needs care and clear steps. Accurate tests help find problems early.
Follow tips to avoid errors and get good results. Use proper tools and check everything.
Avoiding Common Mistakes
Many errors come from rushing or skipping steps. Take time to set up tests well.
Check the relay’s connections before starting. Wrong wiring causes false readings.
- Do not test without reading the relay’s manual.
- Always use the right voltage levels for the test.
- Keep the test environment free from electrical noise.
- Record results carefully to track changes.
Maintaining Testing Equipment
Good tools give better test results. Clean and check your equipment before use.
Replace worn parts and calibrate meters often. This keeps measurements correct and safe.
- Store tools in dry, clean places to avoid damage.
- Inspect cables and leads for cracks or breaks.
- Use calibration services regularly to keep accuracy.
- Keep manuals and guides handy for reference.
Frequently Asked Questions
What Tools Are Needed To Test An Auto Relay?
You need a multimeter, test light, and a 12V power supply. These tools help measure voltage, continuity, and relay activation effectively.
How Do You Check If An Auto Relay Is Working?
Measure coil resistance with a multimeter and check for continuity. Apply voltage to the coil and listen for a clicking sound indicating activation.
Can A Faulty Auto Relay Cause Car Starting Issues?
Yes, a bad auto relay can prevent power flow to the starter. This stops the engine from cranking or starting properly.
How To Test An Auto Relay Without Removing It?
Use a multimeter to check voltage at relay terminals while the ignition is on. This helps determine if the relay is receiving power and activating.
Conclusion
Testing an auto relay ensures your electrical system works well. Follow the steps carefully and use the right tools. Check each part of the relay to find any problems. Regular testing helps avoid unexpected failures. Remember, safety comes first during all tests.
Practicing these simple checks keeps your system reliable. Keep your auto relay in good condition for best results. Trust the process and test with care.