
Are you having trouble with your vehicle’s electrical system? One common culprit could be a faulty auto relay.
Knowing how to test an auto relay yourself can save you time, money, and a lot of frustration. In this guide, you’ll discover simple, step-by-step methods to check if your relay is working properly. By the end, you’ll feel confident tackling this task on your own—and avoid unnecessary trips to the mechanic.
Ready to take control and keep your car running smoothly? Let’s dive in.
Auto Relay Basics
An auto relay is a small electrical switch used in cars and machines. It controls power flow to different parts.
Testing an auto relay helps find problems and keeps devices working well.
Types Of Auto Relays
There are different types of auto relays. Each type has a special job in a vehicle or machine.
- Electromechanical Relays: Use a coil and switch to open or close circuits.
- Solid State Relays: Use electronic parts with no moving pieces.
- Mini Relays: Small relays for limited space areas.
- Micro Relays: Even smaller for precise control.
Key Components
An auto relay has important parts that work together. These parts make it switch power on and off.
- Coil: Creates a magnetic field when powered.
- Armature: Moves to open or close the circuit.
- Contacts: Points that connect or break the electrical path.
- Spring: Returns the armature to its original position.
- Frame: Holds all parts in place.
Common Applications
Auto relays are used in many car and machine systems. They help control power safely and efficiently.
- Starting the engine by controlling the starter motor.
- Operating headlights and fog lights.
- Powering electric cooling fans.
- Controlling fuel pumps for safety.
- Switching horn circuits.
Credit: www.oreillyauto.com
Tools Needed
Testing an auto relay needs a few important tools. These tools help check if the relay works well.
Using the right tools makes the test simple and safe. Here are the main tools you need.
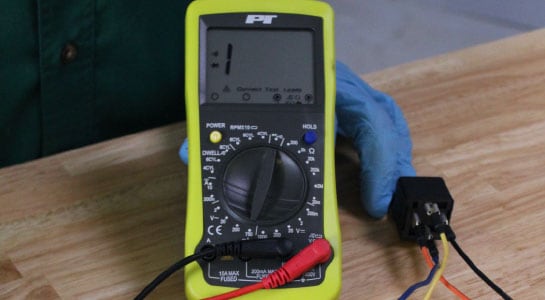
Multimeter
A multimeter measures electrical values like voltage and resistance. It shows if the relay coil and contacts work.
Use the multimeter to check continuity and coil resistance. This helps find broken parts inside the relay.
- Set multimeter to ohms for resistance tests
- Use continuity mode to check relay contacts
- Measure voltage when powering the relay coil
Power Supply
A power supply provides the needed voltage to the relay coil. It makes the relay switch on and off during testing.
Choose a power supply that matches the relay coil voltage rating. This prevents damage and gives accurate results.
- Use DC power supply for most automotive relays
- Match voltage to relay coil specifications
- Adjust current limit to protect the relay
Test Leads
Test leads connect the multimeter and power supply to the relay. Good leads ensure clear signals and safety.
Use insulated and flexible test leads. This helps avoid short circuits and keeps hands safe during tests.
- Choose leads with sharp probe tips for easy contact
- Use color-coded leads for correct wiring
- Check leads for damage before testing
Preparing For The Test
Testing an auto relay is important for car maintenance and repair. Before starting, you need to prepare carefully. This helps keep you safe and makes the test easier to do.
Read the instructions and gather the tools you need. Knowing where the relay is and how to remove it are key steps before testing.
Safety Precautions
Safety is very important when working on your vehicle. Follow these rules to protect yourself and your car.
- Turn off the engine and remove the key from the ignition.
- Disconnect the negative battery terminal to avoid electric shock.
- Wear safety gloves and eye protection.
- Work in a dry, well-lit area.
- Keep tools and parts organized to prevent accidents.
Locating The Relay
Finding the relay is the next step. It is usually in the fuse box or near the battery. Check your vehicle’s manual for the exact location.
| Vehicle Part | Common Relay Location |
| Fuse Box | Under the dashboard or engine compartment |
| Battery Area | Near battery or fuse panel |
| Engine Compartment | Close to the air filter or firewall |
Removing The Relay
After finding the relay, you need to remove it carefully. This allows you to test it separately.
- Make sure the car is off and the battery is disconnected.
- Locate the relay socket or holder.
- Grip the relay firmly and pull it straight out.
- Do not use tools that can damage the relay or socket.
- Place the relay on a clean surface for testing.

Credit: www.youtube.com
Testing Relay Coil
Testing the relay coil is an important step to check if an auto relay works. The coil creates a magnetic field that moves the switch inside the relay.
If the coil is broken or has the wrong resistance, the relay will not work properly. A simple test with a multimeter can find coil problems.
Checking Coil Resistance
First, set your multimeter to the ohms (Ω) setting. This will measure the coil resistance. Remove the relay from the circuit to avoid false readings.
Touch the multimeter leads to the two coil terminals. The meter will show the resistance value of the coil wire inside.
- Use the relay’s datasheet to find the expected coil resistance range.
- Make sure the multimeter leads touch only the coil terminals.
- Do not touch the metal parts with your fingers during the test.
Interpreting Results
If the meter shows a value within the expected range, the coil is good. This means the wire inside is not broken.
A very high or infinite resistance means the coil is open or broken. A very low resistance means the coil is shorted.
- Normal resistance: Coil is fine and can work properly.
- High or infinite resistance: Coil is broken and relay should be replaced.
- Very low resistance: Coil is shorted and relay is faulty.
Testing Relay Contacts
Relay contacts control the flow of electricity in a circuit. Testing them ensures the relay works well. It helps find problems before they cause bigger issues.
You can test relay contacts using simple tools. Two common tests are the continuity test and the contact resistance check. These tests show if the contacts open and close correctly.
Continuity Test
The continuity test checks if the relay contacts connect properly. This test uses a multimeter set to continuity mode. It tells if electricity can flow through the contacts.
To do this test, remove the relay from the circuit. Connect the multimeter leads to the relay contacts. The meter will beep or show zero if the contacts are closed. No beep means the contacts are open or broken.
- Set the multimeter to continuity mode
- Place leads on relay contact terminals
- Listen for a beep or check the meter reading
- Beep means closed contacts; no beep means open
Contact Resistance Check
This test measures the resistance across relay contacts. Low resistance means good contact. High resistance shows worn or dirty contacts. Use a multimeter set to ohms for this test.
Place the meter leads on the contacts. A reading near zero ohms is ideal. If the resistance is high, clean or replace the relay. This test helps keep the relay working smoothly.
- Set multimeter to measure resistance (ohms)
- Touch leads to relay contact terminals
- Check the resistance value on the meter
- Low resistance means good contacts
- High resistance means contacts need service
Applying Power To The Relay
Testing an auto relay involves several steps. Understanding each step ensures the relay functions correctly. This guide focuses on applying power to the relay.
Properly applying power is essential. It helps in checking if the relay is operational.
Energizing The Coil
The coil of the relay needs power to activate. This energizing process is crucial in testing.
- Identify the coil terminals on the relay.
- Connect the power source to these terminals.
- Ensure the power source is suitable for the relay.
Listening For Click Sound
A clear click sound indicates the relay is switching. This sound is a key indicator of relay health.
Verifying Contact Switching
After energizing, verify the relay’s contacts switch. This confirms the relay is working properly.
| Action | Expected Result |
| Power applied to coil | Click sound heard |
| Check contacts | Switching observed |
Troubleshooting Common Issues
Testing an auto relay is important to ensure it works properly. Faulty relays can cause various problems in your vehicle.
This guide will help you troubleshoot common issues with auto relays. Learn how to address specific problems effectively.
No Coil Resistance
No coil resistance in a relay can indicate a broken coil. Check the coil using a multimeter to see if it shows zero resistance.
If the multimeter shows zero, the coil might be damaged. Replacing the relay is often the best solution.
- Set multimeter to resistance setting
- Connect probes to coil terminals
- Look for any reading besides zero
Contacts Not Switching
If relay contacts are not switching, there might be a problem. This can stop electrical current from flowing properly.
Check if the relay clicks when activated. No click means the contacts might not be moving.
- Inspect for physical damage
- Ensure correct voltage supply
- Test contact movement with a multimeter
Intermittent Relay Operation
Intermittent operation is a sign of an unreliable relay. It can cause sudden power loss or device failure.
Check for loose connections or corrosion. These can lead to intermittent issues with the relay.
- Examine relay terminals for dirt
- Ensure all connections are tight
- Replace the relay if problems persist
Tips For Accurate Testing
Testing an auto relay correctly helps ensure it works well. Accurate tests prevent mistakes and save time.
Follow simple tips to get the right results every time you test an auto relay.
Avoiding False Readings
False readings happen when the test shows wrong results. This can happen because of bad connections or damaged tools.
Check your wires and tools before you start. Use clean and tight connections to get true readings.
- Clean relay terminals before testing
- Use a reliable multimeter or tester
- Avoid touching metal parts with your hands
- Test the relay away from other electrical devices
Consistent Test Conditions
Keep the same conditions for every test. Changes in temperature or voltage can affect the results.
Test the relay in a stable environment. Use steady power and avoid sudden changes during testing.
- Test at room temperature
- Use a constant power source
- Repeat tests if conditions change
- Record test settings for future checks

Credit: www.oreillyauto.com
Frequently Asked Questions
How Do You Test An Auto Relay Safely?
To test an auto relay safely, first disconnect the battery. Use a multimeter to check resistance and continuity. Apply power to the relay coil and listen for clicking. Always follow safety guidelines to avoid electrical shocks or damage.
What Tools Are Needed To Test An Auto Relay?
You need a multimeter, a 12V power supply or battery, jumper wires, and possibly a relay test bench. These tools help measure coil resistance, check contacts, and simulate operating conditions to ensure the relay functions correctly.
How Can You Identify A Faulty Auto Relay?
A faulty auto relay may show no clicking sound when powered. Multimeter readings of coil resistance or contact continuity will be abnormal. Symptoms include intermittent electrical issues or failure of connected components.
Why Is Relay Coil Resistance Important In Testing?
Coil resistance indicates if the relay coil is intact. An open or shorted coil means the relay won’t activate. Measuring resistance helps quickly identify coil damage or faults during testing.
Conclusion
Testing an auto relay keeps your vehicle running smoothly. Follow the steps carefully to check its condition. Use a multimeter and listen for clicks during the test. Catching relay problems early saves time and money later. Regular checks help avoid unexpected car troubles on the road.
Keep your tools ready and practice these simple tests often. Reliable relays mean safer drives and fewer breakdowns. Stay confident by knowing how to test your auto relay well.