
If you’re looking to upgrade or replace your motorcycle grips, the first step is knowing exactly how to remove your old ones safely and easily. Struggling with stuck or damaged grips can be frustrating and might even cause damage to your handlebars if you’re not careful.
But don’t worry—this guide will walk you through simple, effective methods that anyone can follow. By the end, you’ll feel confident taking off your grips without any hassle, saving time and avoiding common mistakes. Ready to get started? Let’s dive in.
Tools Needed
Removing motorcycle grips is an easy task with the right tools. Using proper tools helps avoid damage to the handlebars and grips.
This guide lists the essential tools you need to remove motorcycle grips safely and quickly.
Screwdriver
A flathead or Phillips screwdriver helps to loosen screws or pry off old grips gently. Choose the type that fits your motorcycle’s grip setup.
Air Compressor Or Compressed Air Can
Using compressed air allows you to blow air between the grip and handlebar. This method helps to loosen the grip without damage.
Razor Blade Or Utility Knife
A razor blade helps cut old grips if they are stuck. Be careful not to cut the handlebar or your hands.
Lubricants
Lubricants like rubbing alcohol or soapy water make it easier to slide grips off the handlebar.
- Rubbing alcohol evaporates quickly and does not leave residue.
- Soapy water provides enough slip without damaging parts.
Pliers Or Grip Puller Tool
Pliers help to pull off grips if they are tight. A grip puller tool is designed specifically for this task.
Cleaning Cloth
Use a clean cloth to wipe the handlebar after removing the grips. It removes dirt and lubricant residue before installing new grips.
| Tool | Purpose |
| Screwdriver | Loosen screws or pry grips gently |
| Air Compressor or Compressed Air | Blow air to loosen grips |
| Razor Blade | Cut stuck grips carefully |
| Lubricants | Slide grips off easily |
| Pliers or Grip Puller | Pull off tight grips |
| Cleaning Cloth | Clean handlebar after removal |
Preparing The Motorcycle
Before removing motorcycle grips, prepare your motorcycle. This ensures safety and ease during the process.
Proper preparation helps avoid damage and makes grip removal straightforward. Let’s get started.
Gathering The Tools
Gather all necessary tools before you start. This saves time and effort.
- Screwdriver
- Rubbing alcohol
- Compressed air can
- Cloth or rag
Ensuring Safety
Make sure the motorcycle is stable. Safety first to prevent accidents.
- Turn off the engine
- Engage the parking brake
- Use a motorcycle stand
Cleaning The Handlebars
Clean the handlebars to remove dirt. This helps in easy grip removal.
- Use a cloth or rag
- Apply rubbing alcohol
- Wipe thoroughly
Checking Grip Condition
Inspect the grips for wear or damage. Knowing their condition helps in removal.
Old or damaged grips may require different techniques. Be prepared for this.
Loosening The Old Grips
Removing old motorcycle grips is the first step to installing new ones. Grips often stick tight due to dirt, oil, or age.
Loosening them gently prevents damage to the handlebars and makes the process easier.
Using Compressed Air
Compressed air is a quick way to loosen grips without damage. It forces air between the grip and the handlebar.
- Attach a compressor nozzle to a small opening under the grip.
- Turn on the air to blow between the grip and handlebar.
- This creates pressure that loosens the grip.
- Slide the grip off while applying air.
Applying Rubbing Alcohol
Rubbing alcohol acts as a lubricant and evaporates quickly. It helps the grip slide off without leaving residue.
- Pour rubbing alcohol around the edge of the grip.
- Twist the grip back and forth to let alcohol seep inside.
- Wait a few minutes for the alcohol to work.
- Pull the grip off carefully.
Alternative Methods
Other methods can help if compressed air or alcohol are unavailable. Use caution to avoid damage.
| Method | How to Use | Notes |
| Soap and Water | Apply soapy water around the grip, twist, and pull. | May take longer to dry and loosen. |
| WD-40 or Lubricant | Spray a small amount under the grip, wait, then remove. | Clean handlebar after to avoid slipperiness. |
| Cutting Carefully | Use a sharp knife to cut the grip lengthwise. | Last resort; may damage the grip and handlebar. |

Credit: www.youtube.com
Removing The Grips Safely
Removing motorcycle grips can be tricky without the right approach. Safety and care help protect your handlebars and avoid injury.
Use simple tools and follow clear steps to slide off grips and clean any sticky residue left behind.
Sliding Off The Grips
Before removing grips, make sure the bike is turned off and stable. Use a flat tool carefully to avoid damage.
- Insert a flat screwdriver or similar tool under the grip edge.
- Spray a little water or rubbing alcohol to loosen the grip.
- Twist the grip gently back and forth while pulling outward.
- If stuck, slide a thin plastic card between grip and handlebar.
- Pull the grip off slowly to avoid tearing or damage.
Handling Sticky Residue
Sticky residue can remain on the handlebar after the grip is removed. Cleaning it well prepares for new grips.
| Material | Cleaning Method |
| Rubber | Use rubbing alcohol and a cloth |
| Metal | Apply WD-40 and wipe clean |
| Plastic | Use warm soapy water and a soft brush |
Cleaning The Handlebar
Cleaning the handlebar is important before installing new motorcycle grips. Dirt and old adhesive can stop new grips from fitting well.
Proper cleaning makes the handlebar smooth and ready for a secure grip.
Removing Old Adhesive
Remove all old glue or adhesive from the handlebar. This stops bumps under the new grips.
- Use a scraper or razor blade to lift thick glue.
- Apply rubbing alcohol or adhesive remover to soften residue.
- Wipe with a clean cloth until the handlebar looks clear.
- Repeat if any sticky spots remain.
Ensuring A Smooth Surface
Make sure the handlebar surface is even and clean. This helps the new grips fit tightly.
| Task | Tool | Purpose |
| Remove glue | Scraper or razor blade | Lift off old adhesive |
| Clean residue | Rubbing alcohol and cloth | Remove sticky spots |
| Check smoothness | Fingertip | Feel for bumps or rough patches |
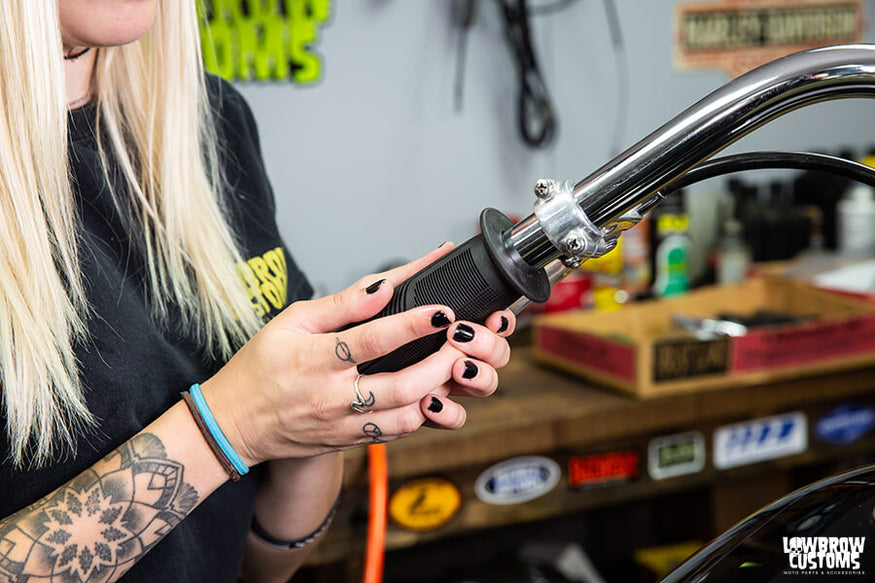
Credit: www.lowbrowcustoms.com
Installing New Grips
Installing new motorcycle grips is important for comfort and control. Proper installation helps you ride safely.
This guide explains how to choose the right grips, apply adhesive, and slide grips into place.
Choosing The Right Grip
Select grips that fit your hands well and match your riding style. Consider the material and texture for good grip and comfort.
- Rubber grips offer good cushioning and grip.
- Foam grips are soft and absorb vibration.
- Silicone grips resist weather and last long.
- Check the grip size to fit your handlebar and hand size.
Applying Adhesive
Adhesive keeps the grips firmly in place. Use the right type and apply carefully to avoid slipping.
| Adhesive Type | Use |
| Grip Glue | Strong hold, dries fast |
| Hair Spray | Temporary hold, easy to adjust |
| Soapy Water | Allows sliding, dries to hold |
Sliding Grips Into Place
Slide the grip onto the handlebar quickly before the adhesive dries. Make sure it is aligned and fully seated.
- Apply adhesive evenly inside the grip.
- Push the grip onto the handlebar firmly.
- Rotate the grip slightly to spread adhesive.
- Wipe off any excess adhesive immediately.
- Let the adhesive cure before riding.
Final Checks
After removing motorcycle grips, you should perform final checks. This ensures your new grips are safe and secure.
Proper checks will prevent accidents and keep your ride smooth. Let’s review the steps for a thorough inspection.
Testing Grip Security
Check if the grips are firmly attached. Gently twist them to test stability.
If the grips move, they need further adjustment. Secure grips prevent slips during rides.
- Gently pull the grips to ensure they don’t slide off.
- Make sure there are no gaps between the grip and handlebar.
- Check for any loose ends or tears in the grip material.
Adjusting If Necessary
If the grips are loose, tighten them. Use adhesive or grip glue for a stronger hold.
Recheck the grips after adjustments. This ensures they are secure and ready for use.
| Check | Action |
| Grip slides | Add adhesive |
| Grip is secure | No action needed |

Credit: m.youtube.com
Frequently Asked Questions
How Do I Safely Remove Motorcycle Grips?
To remove grips safely, use compressed air or rubbing alcohol to loosen adhesive. Slide the grip off gently without damaging the handlebar or throttle tube.
What Tools Are Needed To Remove Motorcycle Grips?
Essential tools include compressed air, a flathead screwdriver, rubbing alcohol, and a clean rag. These help loosen grips and clean the handlebar for reinstallation.
Can I Reuse Motorcycle Grips After Removal?
Reusing grips is not recommended because adhesive weakens. Old grips may slip, reducing control and safety. It’s best to replace grips with new ones.
How Long Does It Take To Remove Motorcycle Grips?
Removing grips typically takes 10 to 20 minutes. Time varies depending on adhesive strength and grip condition. Proper technique speeds up the process.
Conclusion
Removing motorcycle grips is simple with the right steps. Use basic tools and take your time. Avoid rushing to keep the handlebar safe. Clean the area well before adding new grips. Proper grip removal helps your bike feel better to ride.
Practice a few times to get comfortable. Soon, you will change grips like a pro. Enjoy your smoother, safer ride every time.