
If you ride a motorcycle, you know how important your chain is for smooth and safe rides. But what happens when it gets worn out or dirty?
You need to remove it carefully to keep your bike running well. In this guide, you’ll learn exactly how to remove your motorcycle chain step by step. No confusion, no complicated tools—just clear instructions that anyone can follow. Ready to take control of your bike’s maintenance and save money on repairs?
Keep reading, and you’ll master this essential skill in no time.
Tools Needed
Removing a motorcycle chain requires the right tools to work safely and efficiently.
Using proper equipment helps prevent damage and makes the process easier.
Essential Tools List
Gather these tools before starting to remove the motorcycle chain.
- Socket wrench set
- Chain breaker tool
- Needle-nose pliers
- Adjustable wrench
- Flathead screwdriver
- Gloves
- Rag or cloth for cleaning
Safety Gear
Wear safety gear to protect yourself during the chain removal process.
| Safety Gear | Purpose |
| Protective gloves | Protect hands from grease and sharp edges |
| Safety glasses | Shield eyes from debris or chain parts |
| Long sleeves | Protect skin from cuts and scrapes |
| Closed-toe shoes | Protect feet from falling tools or parts |

Credit: www.reddit.com
Prepare The Motorcycle
Removing a motorcycle chain needs careful preparation. It makes the job safe and easier.
Start by setting up the motorcycle in a good position. This helps you reach the chain well.
Positioning The Bike
Place the motorcycle on a flat surface. This stops it from moving while you work.
Keep the bike upright. This gives you clear access to the chain and rear wheel.
- Find a flat, stable ground
- Ensure enough space around the bike
- Keep the bike steady and upright
Engaging The Stand
Use the center stand or paddock stand to lift the rear wheel. This lets the chain move freely.
Make sure the stand holds the bike firmly. A stable bike prevents accidents during chain removal.
- Check the stand’s condition before use
- Lift the rear wheel off the ground
- Confirm the bike is stable on the stand
Loosen The Chain
Loosening the motorcycle chain is important before removal. It helps reduce tension and makes chain removal easier.
Follow the steps carefully to avoid damage to the chain or sprockets.
Identify The Master Link
The master link connects both ends of the motorcycle chain. It allows you to open and remove the chain without breaking it.
- Look for a clip or plate that is different from other links.
- The master link often has a clip holding it in place.
- Check if the link has pins or a removable plate.
- Refer to your motorcycle manual for the exact location.
Release Chain Tension
Releasing the chain tension allows you to slide the chain off the sprocket. You need to adjust the rear wheel to do this.
| Action | Description |
| Loosen Axle Nut | Use a wrench to loosen the rear axle nut slightly. |
| Adjust Chain Tensioners | Turn the chain adjuster bolts on both sides evenly. |
| Push Rear Wheel Forward | Move the wheel forward to reduce chain tension. |
| Tighten Axle Nut | Secure the axle nut to hold the wheel in place. |
| Check Chain Slack | Ensure the chain is loose enough to remove. |
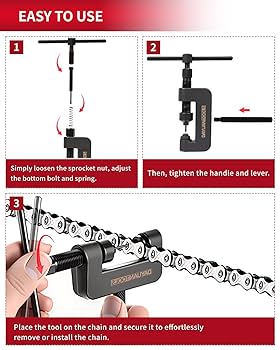
Remove The Chain
Removing a motorcycle chain is a key task for maintenance or replacement. It needs care and the right tools. Follow the steps to do it safely and correctly.
This guide explains how to detach the master link and separate the chain from your motorcycle.
Detach The Master Link
The master link holds the ends of the chain together. Removing it lets you take the chain off the motorcycle. Use pliers or a chain tool to remove the clip or rivet.
- Locate the master link on the chain.
- Use pliers to remove the clip holding the link.
- Push out the master pin carefully.
- Separate the master link from the chain.
- Keep the clip and pins safe for reassembly or replacement.
Separate The Chain
After removing the master link, the chain can be separated. This step is simple but needs attention to avoid damage.
| Action | Details |
|---|---|
| Slide the chain | Gently move the chain off the sprockets. |
| Check for tight spots | Look for stiff links and loosen them with lubricant if needed. |
| Lay the chain flat | Place the chain on a clean surface to inspect or clean. |
Inspect The Chain And Sprockets
Before removing the motorcycle chain, check the chain and sprockets carefully. This helps find any damage or wear that could affect safety and performance.
Inspecting these parts early can save you money and avoid bigger repairs later. Take your time to look closely at each component.
Check For Wear And Damage
Look for signs of wear on the chain links and sprocket teeth. Worn parts can cause the chain to slip or break.
Check for rust, stiff links, and missing or damaged rollers. Also, inspect sprocket teeth for sharp edges or uneven wear.
- Chain links should move smoothly without stiffness
- Rollers must be intact and free of cracks
- Sprocket teeth should be evenly shaped, not hooked or sharp
- Look for rust or corrosion on all parts
Clean The Components
Cleaning the chain and sprockets makes it easier to spot issues. Dirt and grease can hide damage and wear.
Use a brush and a suitable cleaner to remove grime from all parts. Dry everything well before reassembly or removal.
- Use a soft brush to avoid damaging the chain
- Apply chain cleaner or mild degreaser
- Rinse with water and dry with a cloth
- Check again after cleaning for hidden damage

Credit: www.youtube.com
Safety Tips
Removing a motorcycle chain can be tricky. Follow safety tips to avoid accidents.
Always use proper tools and wear protective gear. Keep your workspace clean and organized.
Avoid Common Mistakes
Many people make mistakes when removing a motorcycle chain. Being aware helps you avoid them.
Do not force the chain off. Forcing can damage other parts. Use a chain breaker tool for best results.
- Never remove the chain with the engine on
- Ensure the motorcycle is stable on a stand
- Check the chain tension before removing
Maintain Proper Chain Care
Proper care extends the life of your motorcycle chain. Clean and lubricate it regularly.
After removing and reinstalling the chain, check the tension. Proper tension ensures smooth rides.
- Use quality chain lubricant
- Inspect the chain for wear and tear
- Adjust tension according to manual guidelines
Credit: www.amazon.com
Frequently Asked Questions
How Do I Safely Remove A Motorcycle Chain?
First, secure the motorcycle on a stand for stability. Then, locate the master link or use a chain breaker tool to disconnect the chain carefully. Always wear gloves to protect your hands from sharp edges.
What Tools Are Needed To Remove A Motorcycle Chain?
You will need a chain breaker or master link pliers, a wrench set, and gloves. These tools help loosen and remove the chain efficiently without damaging other parts.
When Should I Replace My Motorcycle Chain?
Replace the chain if it shows signs of rust, stiff links, or excessive slack. Regular maintenance and timely replacement ensure smooth performance and safety.
Can I Reuse A Motorcycle Chain After Removal?
Reusing a chain is not recommended if it’s worn or damaged. A worn chain can cause poor performance and may break, leading to accidents.
Conclusion
Removing a motorcycle chain is simple with the right steps. Take your time and follow each part carefully. Use basic tools and keep safety in mind. Clean the chain and check for wear before removal. This helps your bike run smoothly and last longer.
Practice makes the process easier and quicker. Now, you can remove your chain with confidence and care.