
Have you ever wanted to draw a Ford truck but didn’t know where to start? You’re in the right place.
Drawing a vehicle might seem tricky, but with the right steps, you can create a detailed and impressive Ford truck sketch. This guide breaks down the process into simple, easy-to-follow steps that anyone can follow. By the end, you’ll have the skills to bring your favorite truck to life on paper.
Ready to see how? Let’s get started!

Credit: www.youtube.com
Materials Needed
Drawing a Ford truck takes some basic materials. Getting the right tools helps you create a better sketch. Use simple items you can find at home or a store.
Below are the main materials you will need before starting your drawing. Each one plays a key role in making your artwork clear and neat.
Paper
Choose a smooth, white drawing paper. It should be thick enough to hold pencil lines and erasing. A4 size works well for a detailed truck drawing.
Pencils
- Use a range of pencils from hard (H) to soft (B)
- Hard pencils (2H, 4H) are good for light sketching
- Soft pencils (2B, 4B) help with shading and darker lines
- A mechanical pencil can be useful for fine details
Erasers
Have two types of erasers. A soft rubber eraser removes large areas gently. A kneaded eraser shapes easily to lift small pencil marks without damaging the paper.
Ruler And Compass
| Tool | Purpose |
| Ruler | Helps draw straight lines for the truck’s body |
| Compass | Draws perfect circles for wheels and headlights |
Blending Tools
Use blending stumps or cotton swabs to smooth pencil shading. This adds depth and a realistic look to your truck drawing.
Basic Shapes And Proportions
Drawing a Ford truck starts with simple shapes. These shapes form the truck’s main parts.
Correct proportions help your truck look real. You measure parts to keep the size right.
Start With The Main Body Shape
Use a large rectangle for the truck’s body. This shape shows the truck’s frame and cabin.
Make sure the rectangle is wider than it is tall. This gives the truck a strong look.
Add The Wheel Circles
Draw two circles under the rectangle for wheels. Wheels are usually round and equal size.
Place the wheels near the rectangle’s corners. This keeps the truck balanced and stable.
- Front wheel near the front corner
- Rear wheel near the back corner
- Both wheels equal in size
Sketch The Cabin Shape
Draw a smaller rectangle on top of the main body. This shape is the truck’s cabin.
The cabin should be about half the length of the main body. Keep it centered or slightly forward.
Outline The Truck Bed
Use another rectangle behind the cabin for the truck bed. This shape holds the cargo area.
Make the truck bed shorter than the main body but wide enough to fit the wheels.
Check The Proportions
Compare all shapes to see if they look right together. Adjust sizes to match a real Ford truck.
- Main body is the largest shape
- Cabin is smaller and sits on top
- Truck bed is behind the cabin
- Wheels fit under the body evenly
Drawing The Truck Body
Drawing a Ford truck starts with creating the main body shape. The body includes the cabin and the bed. Focus on simple shapes to build the structure.
Use light lines to sketch first. This makes it easy to adjust the drawing later.
Sketching The Cabin
Start by drawing a rectangle for the cabin. This part holds the driver and passengers. Make sure the rectangle is wide enough for details.
Add a smaller rectangle on top for the roof. Draw a line inside the cabin for the window. Round the corners slightly to show the truck’s shape.
- Draw a large rectangle for the cabin base
- Add a smaller rectangle on top for the roof
- Sketch a horizontal line to separate windows
- Round the corners for a smooth look
Outlining The Bed
Next, draw the truck bed behind the cabin. Use a rectangle that is longer than the cabin. This shows the cargo area.
Connect the bed to the cabin with straight lines. Add details like the wheel arches below the bed. Keep the lines clean and clear.
- Draw a long rectangle for the truck bed
- Connect the bed to the cabin with straight lines
- Sketch wheel arches under the bed
- Keep lines light for easy changes

Credit: www.youtube.com
Adding Wheels And Tires
Drawing the wheels and tires gives your Ford truck a strong, realistic look. Wheels support the vehicle and show its power on the road.
Take your time to add details that make the wheels look round and sturdy. Use simple shapes first, then add tire treads and rims.
Sketch The Wheel Shape
Start by drawing two circles for each wheel. The larger circle is the tire, and the smaller one inside is the rim. Make sure the circles are evenly spaced under the truck body.
Draw Tire Treads
Tire treads add texture and realism. Draw short lines or small blocks around the tire edge to show the pattern. Keep the pattern simple and consistent.
- Use straight or zigzag lines for the tread
- Space the treads evenly around the tire
- Make the pattern bold enough to see clearly
Add Rim Details
Rims often have spokes or designs. Draw lines from the rim center to the edge. You can also add a circle in the middle for the hubcap.
| Rim Style | Details to Draw |
| Spoked | Multiple lines from center to edge |
| Solid | Simple circle with shading |
| Hubcap | Small circle in center with highlights |
Detailing The Front Grill And Lights
The front grill and lights give a Ford truck its strong look. Adding details makes your drawing look real.
Focus on shapes, lines, and small parts when drawing these areas. This guide helps you add those details clearly.
Drawing The Front Grill Shape
Start by sketching the main shape of the grill. It is usually wide and rectangular with rounded edges. Use light lines to mark the outer frame.
Inside the frame, draw horizontal and vertical bars. These bars create a mesh look. Keep the bars evenly spaced to match the truck’s style.
Adding Grill Details
- Draw small gaps between each bar to show depth.
- Use shading to show the shine on metal bars.
- Add the Ford logo in the center of the grill.
- Use darker lines on outer edges to create contrast.
These details help the grill look three-dimensional and strong.
Sketching The Headlights
Headlights are usually rectangular or slightly curved. Draw the main shape first. Use smooth lines for the outer glass cover.
Inside the headlight, draw smaller circles or shapes for bulbs and reflectors. These parts catch the light in real life.
Detailing The Lights
| Light Part | Description | Drawing Tips |
| Outer Glass | Smooth and clear cover | Use light lines and slight curves |
| Bulbs | Small circles inside | Draw small bright circles with shading |
| Reflectors | Reflect light inside the light | Use angled lines or small shapes |
| Light Frame | Edges of the headlight | Use darker, sharp lines for edges |
Drawing Windows And Mirrors
Drawing a Ford truck requires attention to detail. Windows and mirrors are key features. They add realism and depth to your artwork.
These parts reflect light and surroundings. Understanding their shapes helps create an accurate drawing.
Sketching The Window Outline
Begin by sketching the window outlines. Use light pencil strokes for adjustments. Pay attention to proportions and angles.
- Draw the main window shape.
- Add smaller windows like side mirrors.
- Ensure symmetry on both sides.
Adding Details To The Mirrors
Mirrors are vital for realistic drawings. They reflect the world around the truck. Focus on their placement and size.
Use a ruler for straight lines. A compass can help with curved edges.
Refining And Shading The Windows
Once outlines are complete, refine and shade the windows. Use a soft pencil for shading. It adds depth and dimension.
| Shading Tool | Effect |
| HB Pencil | Light shading |
| 2B Pencil | Darker shadows |
| Eraser | Highlight areas |
Adding Texture And Shading
Adding texture and shading brings your Ford truck drawing to life. These details make the truck look more real and three-dimensional.
Use light and shadow to show the shape and surface of the truck. Textures show the material, like metal or rubber.
Use Light Sources To Guide Shading
Decide where the light is coming from before shading. This helps you know where to add shadows and highlights.
Shade the areas farthest from the light darker. Leave the parts closest to the light lighter to show shine.
- Pick a light source direction (top, side, front)
- Shade opposite to the light source
- Add highlights where light hits directly
- Use softer shading for smooth surfaces
Create Metal Texture On The Truck Body
Ford trucks have shiny metal surfaces. Use smooth, even shading to show this effect.
Lightly blend pencil strokes to create a smooth look. Add small bright spots for metal reflections.
- Use horizontal strokes for flat parts
- Add softer shadows near edges
- Draw small bright dots for reflections
- Keep shading smooth without harsh lines
Add Texture To Tires And Rubber Parts
Tires have rough rubber surfaces. Use short, curved lines to show this texture.
Draw small grooves and patterns on the tires. Shade around the grooves to make them stand out.
- Use curved lines to show tire tread
- Shade inside grooves darker
- Use rough shading for rubber texture
- Blend lightly to keep texture visible
Use Cross-hatching For Shadow Areas
Cross-hatching uses crisscross lines to create shading. It works well for dark shadows on the truck.
Draw lines close together for darker areas. Space them out for lighter shadows. This adds depth to your drawing.
- Draw parallel lines in one direction
- Add a second layer of lines crossing the first
- Vary line spacing for shadow intensity
- Use cross-hatching on wheels and under the truck
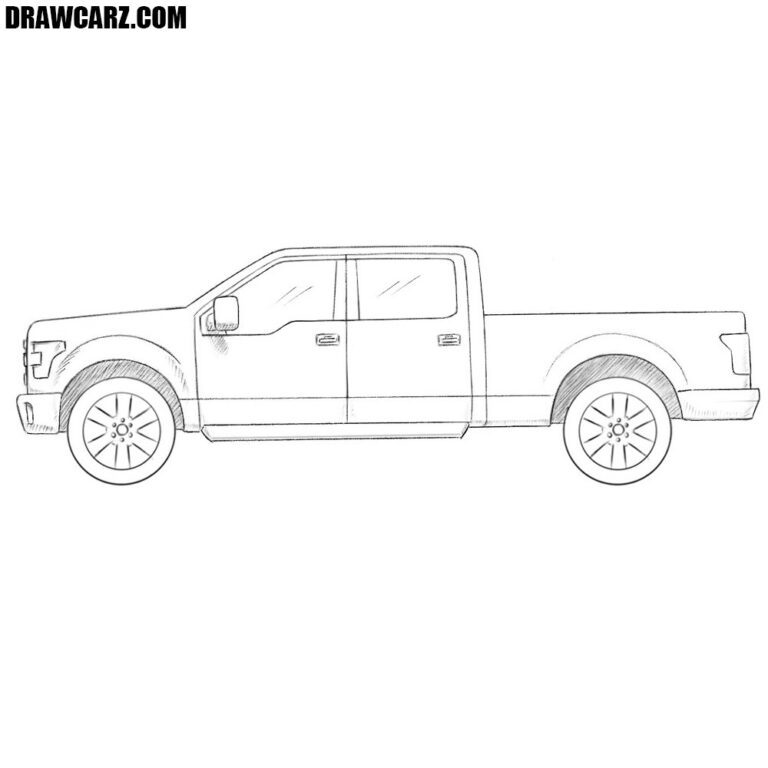
Credit: drawcarz.com
Final Touches And Refinements
Adding final touches to your Ford truck drawing makes it stand out. These refinements can enhance the overall look and detail.
Follow these steps to give your drawing a polished and complete appearance.
Add Details To The Body
Details make the truck look realistic. Focus on door handles, side mirrors, and the grill. These small elements can make a big difference.
- Sketch the door handles carefully
- Draw side mirrors with precision
- Include the grill design with fine lines
Shading And Texture
Shading adds depth to your drawing. Use light and dark tones to give the truck a 3D effect. Texture can simulate metal surfaces.
| Shading Technique | Effect |
| Cross-Hatching | Creates depth |
| Stippling | Adds texture |
| Blending | Softens lines |
Final Review
Examine the drawing for any missed details. Check proportions and fix any errors. A careful review ensures quality.
Inspect your drawing under good lighting. This helps identify areas needing attention. A well-lit environment provides better visibility.
Tips For Improving Your Drawing
Drawing a Ford truck step by step can be fun and easy. Simple tips help you create better sketches.
These tips focus on shapes, details, and practice to improve your truck drawing skills.
Start With Basic Shapes
Use simple shapes like rectangles and circles to outline the truck. This helps to get the right size and form.
Draw light lines so you can erase and adjust easily as you add details.
Focus On Proportions
Check the size of each part compared to the whole truck. Make sure the wheels, windows, and body look balanced.
Use a ruler or your pencil to measure and keep parts in the right scale.
Add Details Slowly
After drawing the basic shapes, add small parts like headlights, grills, and door handles. Take your time.
Details make your truck drawing look real and interesting.
Use References
Look at pictures of Ford trucks to see how they are built. This helps you draw correct shapes and details.
Study different models and angles to improve your understanding.
Practice Shading And Texture
Add shading to show light and shadow on your truck. This gives your drawing depth and form.
Use short lines or dots to create textures like metal or tires.
- Shade darker areas where light does not hit
- Use softer pencil strokes for smooth surfaces
- Draw rough lines for tire texture
Frequently Asked Questions
How Do I Start Drawing A Ford Truck?
Begin with simple shapes to outline the truck’s body and wheels. Use light pencil strokes for easy adjustments. Focus on proportions before adding details.
What Tools Are Best For Drawing A Ford Truck?
Use pencils for sketching, fine liners for outlining, and colored pencils or markers for shading. A ruler helps with straight lines.
How Can I Add Realistic Details To My Ford Truck Drawing?
Observe reference photos closely. Add details like headlights, grill patterns, and tire treads. Use shading to create depth and texture.
How Long Does It Take To Draw A Ford Truck Step By Step?
It varies by skill, but typically 30 to 60 minutes. Take your time to focus on each step for accuracy.
Conclusion
Drawing a Ford truck can be fun and rewarding. Follow each step slowly and carefully. Practice helps improve your skills and confidence. Don’t rush; take your time with details. Use simple shapes first, then add more features. Keep your lines light so you can adjust them.
Enjoy the process of creating your own truck art. With patience, your drawing will look great. Keep practicing, and you will get better every time. Drawing a Ford truck is a cool way to express creativity. Try it again and see your progress grow.