
If your car’s air conditioner isn’t cooling like it used to, charging it with manifold gauges might be the fix you need. You might think this is a job best left to professionals, but with the right tools and clear steps, you can do it yourself—and save time and money.
In this guide, you’ll learn exactly how to use manifold gauges to charge your auto AC safely and effectively. By the end, you’ll feel confident handling this task and keeping your car cool no matter how hot it gets outside.
Ready to take control of your car’s comfort? Let’s dive in.
Credit: www.vevor.com
Tools And Safety Gear
Charging an auto AC requires the right tools and safety gear. Using proper equipment helps you work safely and correctly.
This guide explains the key tools and safety gear you need for charging an auto AC with manifold gauges.
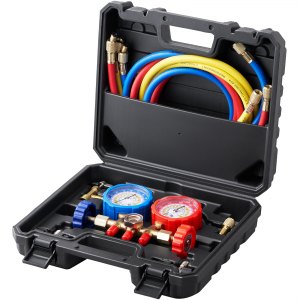
Manifold Gauges Setup
Manifold gauges measure the pressure in your car’s AC system. They help you add the right amount of refrigerant.
Set up the gauges carefully to avoid leaks and wrong readings.
- Connect the blue hose to the low-pressure port.
- Connect the red hose to the high-pressure port.
- Attach the yellow hose to the refrigerant tank.
- Make sure all connections are tight to prevent leaks.
- Check that the valves on the manifold are closed before starting.
Protective Equipment
Wear protective gear to keep yourself safe from harmful chemicals and cold refrigerant.
Using the right safety equipment reduces the risk of injury while working on the AC system.
- Safety goggles to protect your eyes from splashes.
- Gloves to keep your hands safe from cold and chemicals.
- Long sleeves to protect your skin from refrigerant burns.
- Work in a well-ventilated area to avoid inhaling fumes.
Credit: www.taurusclub.com
Preparing The Vehicle
Before charging your car’s AC with manifold gauges, you need to prepare the vehicle properly. This ensures accurate readings and safe handling of refrigerant.
Two main tasks are locating the service ports and checking the refrigerant type. Both steps are key to a smooth charging process.
Locate Service Ports
Service ports allow you to connect the manifold gauges to the AC system. They are usually found on the low-pressure and high-pressure sides.
- Open the car hood and find the AC lines.
- Look for two metal ports with plastic caps.
- The low-pressure port is larger and often on the bigger AC line.
- The high-pressure port is smaller and on the smaller AC line.
- Remove the caps carefully before attaching gauges.
Check Refrigerant Type
Using the correct refrigerant is important. Different vehicles use different types, which affect charging and safety.
| Refrigerant Type | Common Vehicle Use | Label Color |
|---|---|---|
| R-134a | Most cars from 1994 to 2015 | Red or Light Blue |
| R-1234yf | Newer cars after 2015 | Yellow or Green |
| R-12 (No longer used) | Older cars before 1994 | Blue |
Connecting Manifold Gauges
Manifold gauges help check and charge your car’s AC system. Proper connections ensure accurate readings.
Follow these steps to connect your manifold gauges safely and correctly.
Attach Low-pressure Hose
Find the low-pressure port on your car’s AC system. It is usually larger and marked with an L.
Connect the blue low-pressure hose from the manifold gauge to this port. Make sure it fits tightly.
- Locate the low-pressure service port
- Remove the cap carefully
- Push the blue hose connector onto the port
- Check for a secure, leak-free fit
Attach High-pressure Hose
Find the high-pressure port on the AC system. It is smaller and marked with an H.
Connect the red high-pressure hose from the manifold gauge to this port. Tighten it well.
- Locate the high-pressure service port
- Remove the protective cap
- Attach the red hose connector firmly
- Ensure no gaps or leaks at the connection
Connect Refrigerant Tank
Place the refrigerant tank near the manifold gauges. Make sure the valve is closed before connecting.
Attach the center hose from the manifold gauge to the tank. Tighten the connection to avoid leaks.
- Keep the tank upright on a flat surface
- Check that the valve is off
- Connect the center hose to the tank valve
- Secure the connection tightly
Reading Pressure Levels
Checking your auto AC pressure is key for proper charging. Manifold gauges help measure these pressure levels accurately. Understanding the readings guides you in adding the right amount of refrigerant.
Pressure levels change with temperature and system condition. Reading them correctly avoids damage and keeps your AC working well.
Normal Pressure Ranges
Knowing normal pressure ranges lets you spot if your AC system is fine or needs attention. These ranges differ between the low and high sides of the system.
| Side | Normal Pressure Range (PSI) |
| Low Side | 25 to 45 PSI |
| High Side | 200 to 250 PSI |
Pressures should be checked at room temperature, usually around 75°F (24°C). If readings fall outside these ranges, there might be a problem.
Identifying Leaks
Low pressure readings often mean leaks in the AC system. You can confirm this by looking for other signs.
- Listen for hissing sounds near hoses or connections.
- Look for oily residue on AC components.
- Use a soap solution to check for bubbles on suspected areas.
- Check if the system loses pressure over time when off.
Fixing leaks before charging keeps the system sealed and effective. Always repair leaks before adding refrigerant.
Charging The Ac System
Charging an auto AC system with manifold gauges helps keep the car cool. It lets you add refrigerant safely and correctly.
Using the gauges, you can check pressure and add refrigerant step by step. This ensures the system works well.
Opening Valves Correctly
Open the valves slowly to avoid sudden pressure changes. This protects the AC system and gauges from damage.
Start by turning the low-pressure valve first. Then open the high-pressure valve if needed, but only slightly.
- Turn the low-pressure valve counterclockwise slowly
- Check the gauge readings as you open the valve
- Open the high-pressure valve only if the system requires it
- Close valves tightly after charging
Adding Refrigerant Gradually
Add refrigerant in small amounts to avoid overcharging. Watch the pressure gauges closely during charging.
Pause often to let the system stabilize. This helps keep the right pressure and prevents damage.
- Shake the refrigerant can before use
- Add refrigerant slowly through the low-pressure side
- Check the low and high-pressure readings regularly
- Stop adding refrigerant when the pressure matches the recommended level
Monitoring System Performance
Monitoring your car’s AC system performance is important. It ensures comfort during your drives. Using manifold gauges helps in checking system health.
Learning to use these tools can save time and money. They help identify issues early and maintain efficiency.
Temperature Checks
Temperature checks are key in assessing AC performance. The temperature of the air from the vents should be cooler than the outside air.
- Measure the vent temperature with a thermometer.
- Compare it with the ambient temperature.
- Ensure a significant temperature drop.
Adjusting Refrigerant Amount
Correct refrigerant levels are crucial for AC efficiency. Too little or too much can cause issues.
| Gauge Reading | Action Required |
| Low | Add refrigerant |
| Normal | No action |
| High | Remove excess refrigerant |
Disconnecting And Final Checks
After charging your car’s AC, it’s important to disconnect the manifold gauges safely. This ensures your safety and the proper functioning of the AC system.
Final checks are crucial to confirm that everything works correctly. Inspecting for leaks helps in maintaining the efficiency of the AC system.
Removing Gauges Safely
Carefully removing the manifold gauges prevents refrigerant loss and potential injuries. Follow these steps to ensure a safe disconnect:
- Turn off the vehicle engine.
- Close the low and high-pressure valves on the manifold gauge set.
- Gently disconnect the hoses from the service ports.
- Store the manifold gauges in a safe place.
Inspecting For Leaks
Checking for leaks ensures the AC system is sealed properly and operates efficiently. Use these methods to inspect the system:
- Use a leak detection spray to find any visible leaks.
- Listen for hissing sounds which may indicate a leak.
- Check for oily residue around the connections.

Credit: www.amazon.com
Frequently Asked Questions
What Are Manifold Gauges Used For In Auto Ac Charging?
Manifold gauges measure pressure in an auto AC system. They help monitor refrigerant levels and identify leaks. This ensures accurate and safe charging of the AC system.
How Do I Connect Manifold Gauges To An Auto Ac System?
Connect the blue hose to the low-pressure port and the red hose to the high-pressure port. Attach the yellow hose to the refrigerant tank. Always ensure connections are tight to prevent leaks.
Can I Charge My Car Ac With Manifold Gauges Alone?
No, manifold gauges are essential but not sufficient alone. You also need the correct refrigerant, safety gear, and knowledge of pressure readings to charge properly.
What Safety Precautions Should I Take When Charging Auto Ac?
Wear safety goggles and gloves. Work in a well-ventilated area. Avoid direct contact with refrigerant and never overcharge the system to prevent damage.
Conclusion
Charging your auto AC with manifold gauges is simple with practice. Always check the pressure readings carefully to avoid mistakes. Use the right refrigerant type for your vehicle. Work in a safe place and wear protective gear. Take your time and follow each step closely.
This method helps keep your car cool and comfortable. Regular maintenance can extend your AC’s life. Keep these tips in mind to do the job right.