Your motorcycle’s chain is one of the most important parts that keeps your ride smooth and safe. If it’s too loose or too tight, you could face serious problems like poor performance or even damage to your bike.
But don’t worry—adjusting your motorcycle chain is easier than you think. In this guide, you’ll learn simple, step-by-step tips to get your chain just right. Keep reading, and you’ll save money, improve your bike’s lifespan, and enjoy a safer ride every time you hit the road.

Credit: www.youtube.com
Tools Needed
Adjusting a motorcycle chain requires the right tools to do the job safely. Using proper tools helps keep the chain tight and the bike running smoothly.
Here are the basic tools you need for adjusting your motorcycle chain.
Wrench Or Socket Set
A wrench or socket set is necessary to loosen the axle nut. This nut holds the wheel in place, and loosening it allows you to adjust the chain tension.
Choose the right size wrench or socket for your motorcycle’s axle nut to avoid damage.
Chain Adjuster Tool Or Spanners
Chain adjusters help move the rear wheel backward or forward. Some bikes use special spanners to turn the adjusters on each side of the swingarm.
Use matching spanners to keep the wheel aligned and maintain even chain tension.
Torque Wrench
A torque wrench is important for tightening the axle nut to the correct pressure. This keeps the wheel secure without damaging parts.
Check your motorcycle manual for the exact torque value needed.
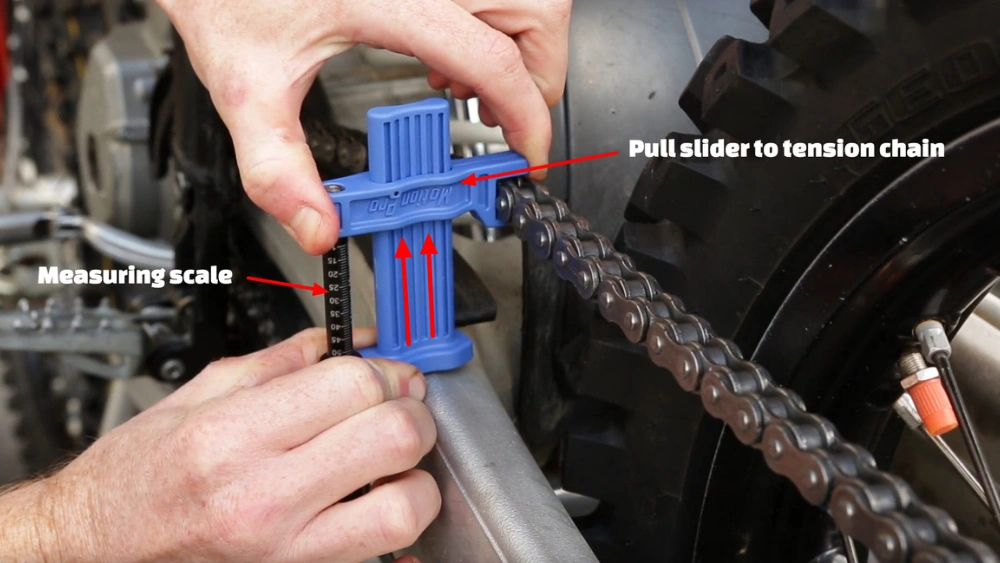
Ruler Or Chain Tension Gauge
You need a ruler or chain tension gauge to measure the slack in your chain. Proper slack prevents too much wear or damage to the chain and sprockets.
Measure chain slack at the middle point between sprockets for the best accuracy.
Cleaning Supplies
Clean the chain before adjusting to remove dirt and grime. Use a chain cleaner or degreaser and a soft brush.
Cleaning helps you see the chain condition clearly and improves adjustment results.
Gloves
Wear gloves to protect your hands from grease and sharp edges on the chain and sprockets.
Gloves also improve grip on tools and parts during the adjustment process.
Signs Of Loose Or Tight Chain
Your motorcycle chain must have the right tension. A loose or tight chain can cause problems. It affects your bike’s performance and safety.
Checking for signs of a loose or tight chain helps you know when to adjust it. This keeps your ride smooth and safe.
Signs Of A Loose Chain
A loose chain can slip off the sprockets or make noise. It may also cause jerky movement while riding.
- Chain appears to sag more than usual
- Clicking or rattling sounds from the chain area
- Chain skips or slips during acceleration
- Uneven or jerky power delivery
- Visible gaps between chain and sprockets
Signs Of A Tight Chain
A tight chain can cause strain on the motorcycle’s parts. It may lead to stiff handling and faster wear.
- Chain feels hard to move by hand
- Difficulty in turning the rear wheel smoothly
- Chain pulls or tugs during riding
- Excessive wear on sprocket teeth
- Vibration or noise when riding at high speeds
Preparing The Motorcycle
Before adjusting your motorcycle chain, you must prepare the bike properly. This helps you work safely and get the best results.
Taking time to prepare the motorcycle makes the chain adjustment easier and more accurate. Follow these key steps first.
Park The Motorcycle On A Level Surface
Place your motorcycle on flat ground. This keeps the bike steady and ensures the chain tension is measured correctly.
- Use a garage floor or driveway
- Avoid slopes or uneven surfaces
- Check for solid footing under the tires
Secure The Motorcycle
Make sure the motorcycle will not move while you adjust the chain. Use a center stand or paddock stand if available.
- Center stand keeps bike upright
- Paddock stand supports rear wheel
- Use wheel chocks for extra safety
Clean The Chain And Sprockets
Remove dirt and grease from the chain and sprockets. Clean parts give a better view for adjustment and reduce wear.
- Use a soft brush and chain cleaner
- Wipe with a clean cloth
- Allow parts to dry before adjusting
Check Chain Tension And Condition
Look at the chain slack and condition before adjusting. Note any tight spots or damage that may need repair.
- Press the chain midway between sprockets
- Measure the slack according to your manual
- Inspect for rust, cracks, or stiff links
Measuring Chain Slack
Measuring motorcycle chain slack is important for safe riding. Too tight or too loose chains can cause problems.
Check the chain slack regularly to keep your bike running smoothly and avoid damage.
Locate The Tightest Part Of The Chain
First, find the chain’s tightest section. The chain may have spots that are looser than others.
Use Proper Tools For Measurement
You need a ruler or tape measure to check the chain slack accurately. A flashlight can help you see the chain better.
Measure Chain Slack Correctly
Push the chain up and down at the tightest point. Measure the total movement to find the slack.
- Place the ruler under the chain.
- Push the chain upward and note the highest point.
- Push the chain downward and note the lowest point.
- Calculate the total vertical movement.
Compare Measurement To Manufacturer’s Specs
| Motorcycle Type | Recommended Chain Slack |
| Sport Bikes | 20-30 mm (0.8-1.2 inches) |
| Cruisers | 25-35 mm (1.0-1.4 inches) |
| Off-road Bikes | 30-40 mm (1.2-1.6 inches) |
Adjust Chain Slack If Needed
If your chain slack is outside the recommended range, adjust it. Follow your motorcycle manual for the right method.
Loosening The Axle Nut
Loosening the axle nut is the first step in adjusting your motorcycle chain. This nut holds the rear wheel in place.
You need to loosen it carefully before adjusting the chain tension. Doing this right will keep your motorcycle safe.
Gather Necessary Tools
Before loosening the axle nut, get the right tools ready. This makes the job easier and safer.
- Use a wrench or socket set that fits the axle nut size.
- Have a breaker bar for extra leverage if the nut is tight.
- Use gloves to protect your hands from slips.
Prepare The Motorcycle
Make sure the motorcycle is stable before loosening the nut. This prevents accidents.
- Place the bike on a center stand or paddock stand.
- Ensure the bike is on level ground.
- Engage the front brake to keep the wheel from moving.
Loosen The Axle Nut Properly
Follow these steps to loosen the axle nut without damage.
- Place the wrench or socket securely on the axle nut.
- Turn the wrench counterclockwise to loosen the nut.
- If the nut is very tight, use a breaker bar for more force.
- Loosen the nut enough to allow rear wheel movement.
- Do not fully remove the nut; just loosen it for chain adjustment.
Check Axle Nut Torque Specifications
After adjusting the chain, you must retighten the axle nut to the right torque.
| Motorcycle Make | Axle Nut Torque (Nm) |
| Honda | 100 |
| Yamaha | 110 |
| Kawasaki | 105 |
| Suzuki | 95 |
| Harley-Davidson | 120 |
Adjusting The Chain Tension
Keeping your motorcycle chain at the right tension helps it last longer. A chain that is too tight or too loose can cause problems.
Adjusting the chain tension is a simple task you can do at home with basic tools.
Check The Chain Slack
Start by finding the chain slack. This is how much the chain moves up and down.
Use your finger to push the chain at the midpoint between sprockets. Measure the movement.
- Too much slack means the chain is loose.
- Too little slack means the chain is tight.
- Ideal slack is usually 20-30 mm (check your manual).
Loosen The Rear Axle Nut
Before adjusting, loosen the rear axle nut slightly. This allows the wheel to move.
Use the correct size wrench or socket to avoid damaging the nut.
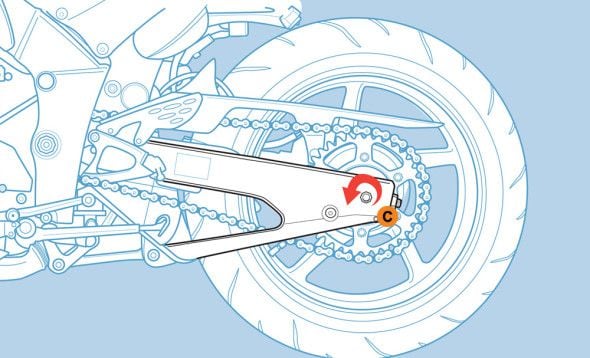
Adjust The Chain Tension Bolts
Find the chain adjuster bolts on each side of the rear wheel. Turn them evenly to change tension.
Turning the bolts outward tightens the chain. Turning them inward loosens it.
- Turn both bolts the same amount.
- Check the chain slack after each turn.
- Keep the rear wheel aligned.
Tighten The Rear Axle Nut
After adjusting, tighten the rear axle nut firmly. This keeps the wheel and chain in place.
Double-check the chain slack and wheel alignment once the nut is tight.
Lubricate The Chain
After adjusting tension, clean and lubricate the chain. This reduces wear and noise.
- Use a good quality chain lubricant.
- Apply lubricant to the inner side of the chain.
- Wipe off excess lubricant to avoid dirt buildup.
Aligning The Rear Wheel
Aligning the rear wheel is key for a smooth ride. It helps the motorcycle run straight and keeps the chain from wearing out.
This guide explains how to check and adjust the rear wheel alignment properly.
Check The Wheel Alignment Marks
Most motorcycles have marks on the swingarm near the rear axle. These marks help you see if the wheel is straight.
Compare the marks on both sides of the swingarm. They should line up evenly.
- Locate the alignment marks on both sides
- Ensure the marks are at the same position
- Adjust if the marks do not match
Loosen The Rear Axle Nut
Before adjusting, loosen the rear axle nut slightly. This lets you move the wheel without force.
Use the correct size wrench or socket to avoid damage.
Adjust The Chain Tension Bolts Evenly
Turn the chain tension bolts on both sides of the swingarm equally. This moves the wheel forward or backward.
Move the wheel until the alignment marks line up perfectly on both sides.
- Turn bolts the same amount on each side
- Check the alignment marks after each turn
- Keep the chain tension correct while adjusting
Tighten The Rear Axle Nut
After aligning the wheel, tighten the rear axle nut firmly. This locks the wheel in place.
Double-check the alignment marks to ensure nothing moved.
Test The Alignment
Spin the rear wheel and watch the chain. It should run smoothly without wobbling.
Ride slowly and check if the bike tracks straight. Adjust again if needed.

Credit: www.bikesales.com.au
Tightening The Axle Nut
The axle nut on your motorcycle keeps the wheel secure. Proper tightening is crucial for safety and performance. Let’s look at how to tighten it correctly.
Ensure you have the correct tools and understand the process. This helps prevent any accidents or damage to your motorcycle.
Gather Your Tools
Having the right tools makes the job easier. You will need a wrench or a socket set.
- Torque wrench
- Socket set
- Axle stand
Loosen The Locking Mechanism
Before tightening, ensure the locking mechanism is loose. This allows you to adjust the axle nut freely.
Tighten The Axle Nut
Use a torque wrench to tighten the axle nut. This ensures the correct amount of force is applied.
| Axle Size | Torque Specification |
| 14mm | 65 Nm |
| 16mm | 85 Nm |
| 18mm | 105 Nm |
Check Alignment
After tightening, check the wheel alignment. Misalignment can cause uneven tire wear and affect handling.
Adjust if necessary, to ensure smooth and safe rides.
Final Chain Check
After adjusting your motorcycle chain, a final check is needed. This ensures everything is secure and properly aligned.
A well-adjusted chain improves your motorcycle’s performance. It also extends the life of the chain and sprockets.
Check Chain Tension
Chain tension is crucial for smooth rides. It should not be too tight or too loose.
- Place the bike on its stand
- Press the chain to check the slack
- Adjust if the slack is not within recommended range
Inspect Chain Alignment
Proper alignment ensures the chain moves smoothly. Misalignment can cause wear and tear.
Check alignment by looking along the chain’s length. Make sure it is straight and centered on the sprockets.
Verify Locking Mechanisms
Ensure all nuts and bolts are tight. This prevents the chain from loosening while riding.
- Use a wrench to tighten loose bolts
- Double-check the locking nuts
Test Ride
A short test ride helps confirm everything is set. Listen for unusual noises or vibrations.
If the ride feels smooth and quiet, your chain is correctly adjusted. Enjoy your ride safely!
Maintenance Tips For Chain Longevity
Keeping your motorcycle chain in good shape helps your bike run smoothly. Regular care can prevent wear and tear.
Adjusting the chain properly is key to making it last longer. This guide shares useful tips on chain maintenance.
Check Chain Tension Regularly
Proper chain tension stops the chain from being too loose or tight. Both conditions cause damage over time.
Use your motorcycle manual to find the correct slack range. Measure the chain slack with the bike on a stand.
- Find the midpoint between sprockets
- Push the chain up and down
- Measure the slack distance
- Adjust if it is outside the recommended range
Clean The Chain Often
Dirt and grime build up on the chain and cause faster wear. Clean the chain every few rides or after wet weather.
Use a soft brush and chain cleaner to remove dirt. Avoid harsh chemicals that can damage rubber seals.
- Lift the rear wheel or use a stand
- Spray chain cleaner generously
- Scrub gently with a brush
- Rinse with water and dry well
Lubricate The Chain Properly
Lubrication reduces friction and wear on the chain links. Apply chain lubricant after cleaning and drying the chain.
Choose a lubricant made for motorcycle chains. Spray it evenly on the inside of the chain while spinning the rear wheel.
- Lubricate every 300-600 miles or after washing
- Avoid over-lubricating to prevent dirt buildup
- Use wax-based or oil-based lubricants as recommended
Inspect For Wear And Damage
Look for signs of chain wear like rust, stiff links, or missing O-rings. Replace the chain if damage is severe.
Check sprockets for sharp or hooked teeth. Worn sprockets can harm a new chain and reduce its life.
- Examine the chain for rust or corrosion
- Check if the chain moves smoothly
- Inspect sprockets for tooth shape and wear
- Replace worn parts promptly
Adjust Chain Alignment
Chain alignment keeps the chain running straight between sprockets. Misalignment causes uneven wear and noise.
Use alignment marks on the swingarm to line up the rear axle correctly. Tighten the axle nuts after adjustment.
- Loosen the rear axle nut
- Adjust chain tension bolts evenly on both sides
- Align axle using swingarm marks
- Tighten axle nut securely
- Recheck chain slack and alignment
Credit: www.cycleworld.com
Frequently Asked Questions
How Often Should I Adjust My Motorcycle Chain?
You should check and adjust your motorcycle chain every 500-1,000 miles. Regular adjustments ensure smooth riding and prevent chain wear or damage.
What Tools Do I Need To Adjust A Motorcycle Chain?
Common tools include a wrench, screwdriver, and chain adjuster tool. Some motorcycles may require a torque wrench for precise adjustments.
How Do I Check Motorcycle Chain Slack Correctly?
Measure slack by pressing the chain midway between sprockets. The ideal slack usually ranges from 20-30 mm but check your owner’s manual.
Can I Ride With A Loose Motorcycle Chain?
Riding with a loose chain can cause poor performance and safety risks. Adjust the chain promptly to avoid accidents or damage.
Conclusion
Keeping your motorcycle chain properly adjusted helps your bike run smoothly. Check the tension regularly to avoid problems. Tighten or loosen the chain as needed for safe riding. Clean and lubricate the chain to extend its life. A well-maintained chain improves performance and safety.
Taking a few minutes for adjustment saves costly repairs later. Ride with confidence knowing your chain is in good shape. Simple steps make a big difference on the road.